Description
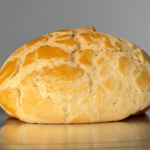
Pineapple buns, or Bo Lo Bao, are iconic treats found in Hong Kong bakeries. A soft and slightly sweet bun gives way to a golden, crunchy topping that shatters delightfully with each bite.
Ingredients
Units
Scale
For the Tangzhong
- 100 ml milk
- 20 g bread flour
For the buns
- 125 g milk (warm)
- 1 tsp active dry yeast
- 50 g caster sugar (divide 40 g + 10 g)
- 335 g bread flour
- 1/2 tsp salt
- 1 large egg
- 55 g unsalted butter (softened)
- 1 tsp vegetable oil (for the dough proofing bowl)
For the Topping
- 250 g all purpose flour
- 1/4 tsp baking soda
- 1/4 tsp salt
- 113 g unsalted butter (softened)
- 80 g caster sugar
- 1 large egg
- 1/2 tsp vanilla extract
For the egg wash
- 1 egg (separated)
Instructions
For the Tangzhong
- Cook the milk and the flour in a saucepan over low heat for around 2 to 3 minutes, keep whisking, or until it turns into a paste.
- Transfer the paste into a small bowl and let it cool to warm before using.
For the Buns
- Place 10 g caster sugar and the yeast into the warm milk. Stir and mix them well. Cover with a small towel for around 5 minutes or until foamy.
- Add flour, salt and 40 g caster sugar into the mixing bowl of a stand mixer. Begin to mix by hand, using a spatula. Mix thoroughly and gradually create a well in the centre of the mix. Pour in the egg, bloomed yeast mixture and warm Tangzhong.
- Attach a dough hook and start kneading the mixture at low speed until everything comes together. Gradually add the softened butter, a little at a time.
- When all the butter is incorporated, turn the mixer to medium speed. Continue to knead for 3 to 5 minutes or until it passes the windowpane test. This involves taking a small piece of dough and gently stretching it until it is thin enough to see light through it, without it tearing.
- Transfer the dough to an oiled bowl and cover it with cling film. Place it in a warm place for the first proof until it doubles in size. It takes between 1 and 2 hours.
- Remove the cling film, sprinkle some flour on top of the proofed dough. Knock out the air and transfer it to a lightly floured surface. Knead the dough for around 2 to 3 minutes and shape into a smooth ball.
- Divide the dough into 12 equal pieces using a kitchen scale, around 58 g each.
- Shape each dough into a ball. Start by pulling the sides down toward the bottom to create a smooth surface. Then pinch the seam to seal it securely. Place the dough on the surface and use your palm as a gentle guide to gradually shape a smooth ball.
- Place the shaped balls of dough on a lined baking tray.
- Cover with a tea towel and leave them on the countertop for the 2nd proof until they’ve almost doubled in size (around 90 minutes).
For the Topping
- Whisk the egg and set aside.
- Cream the butter and the sugar in a mixing bowl, start with a spatula, then mix with a hand held mixer until pale and fluffy.
- Continue to mix and add in the beaten egg, in two batches, until they are well combined.
- Add the vanilla extract and mix well.
- Sift the flour, baking soda and salt into the mixture, pushing through with a spatula.
- When everything is well combined, transfer onto a lightly floured surface. Push the dough together using your hands and gradually pat it into a flat shape (a rough disc is easiest to divide).
- Divide into 12 equal pieces, using a kitchen scale, around 40 g each.
- Roll each piece into a ball and flatten by hand. Roll into a 3-inch round disc and nudge the edges to create a circle. It doesn’t need to be perfect.
- Continue to shape the rest of the pieces.
Prepare and apply the topping
- Separate the egg, whisk the whites and yolks separately. The white is for securing the toppings while the yolks will be for an egg washed finish.
- Preheat the oven to 180°C / 355°F.
- Brush a thin layer of egg white on top of the bun. Carefully lift up a shaped topping and place it on top of the bun. Gently press it down and seal the edges.
- Repeat for the rest of the toppings.
Bake the buns
- To create a golden brown finish, egg wash the toppings by brushing on a thin layer of the beaten egg yolks.
- Bake the buns in a preheated oven for about 18 to 20 minutes or until golden brown.
- Transfer to a wire rack to cool down for around 5 minutes.
- Serve warm or enhance by slicing open and adding a generous chunk of cold butter – absolutely delicious!
Notes
- watch my video tutorial to see how I made the delicious pineapple buns in action
- the buns are best to serve when they are still warm
- wrap the buns in foil and reheat them in an oven
- keep the buns in an airtight container for up to 3 days
Nutrition
- Calories: 448
- Sugar: 62
- Sodium: 275
- Fat: 3.6
- Saturated Fat: 1.8
- Carbohydrates: 60.9
- Fiber: 0.1
- Protein: 37.8
- Cholesterol: 83
