Christmas Pattern Swiss Roll
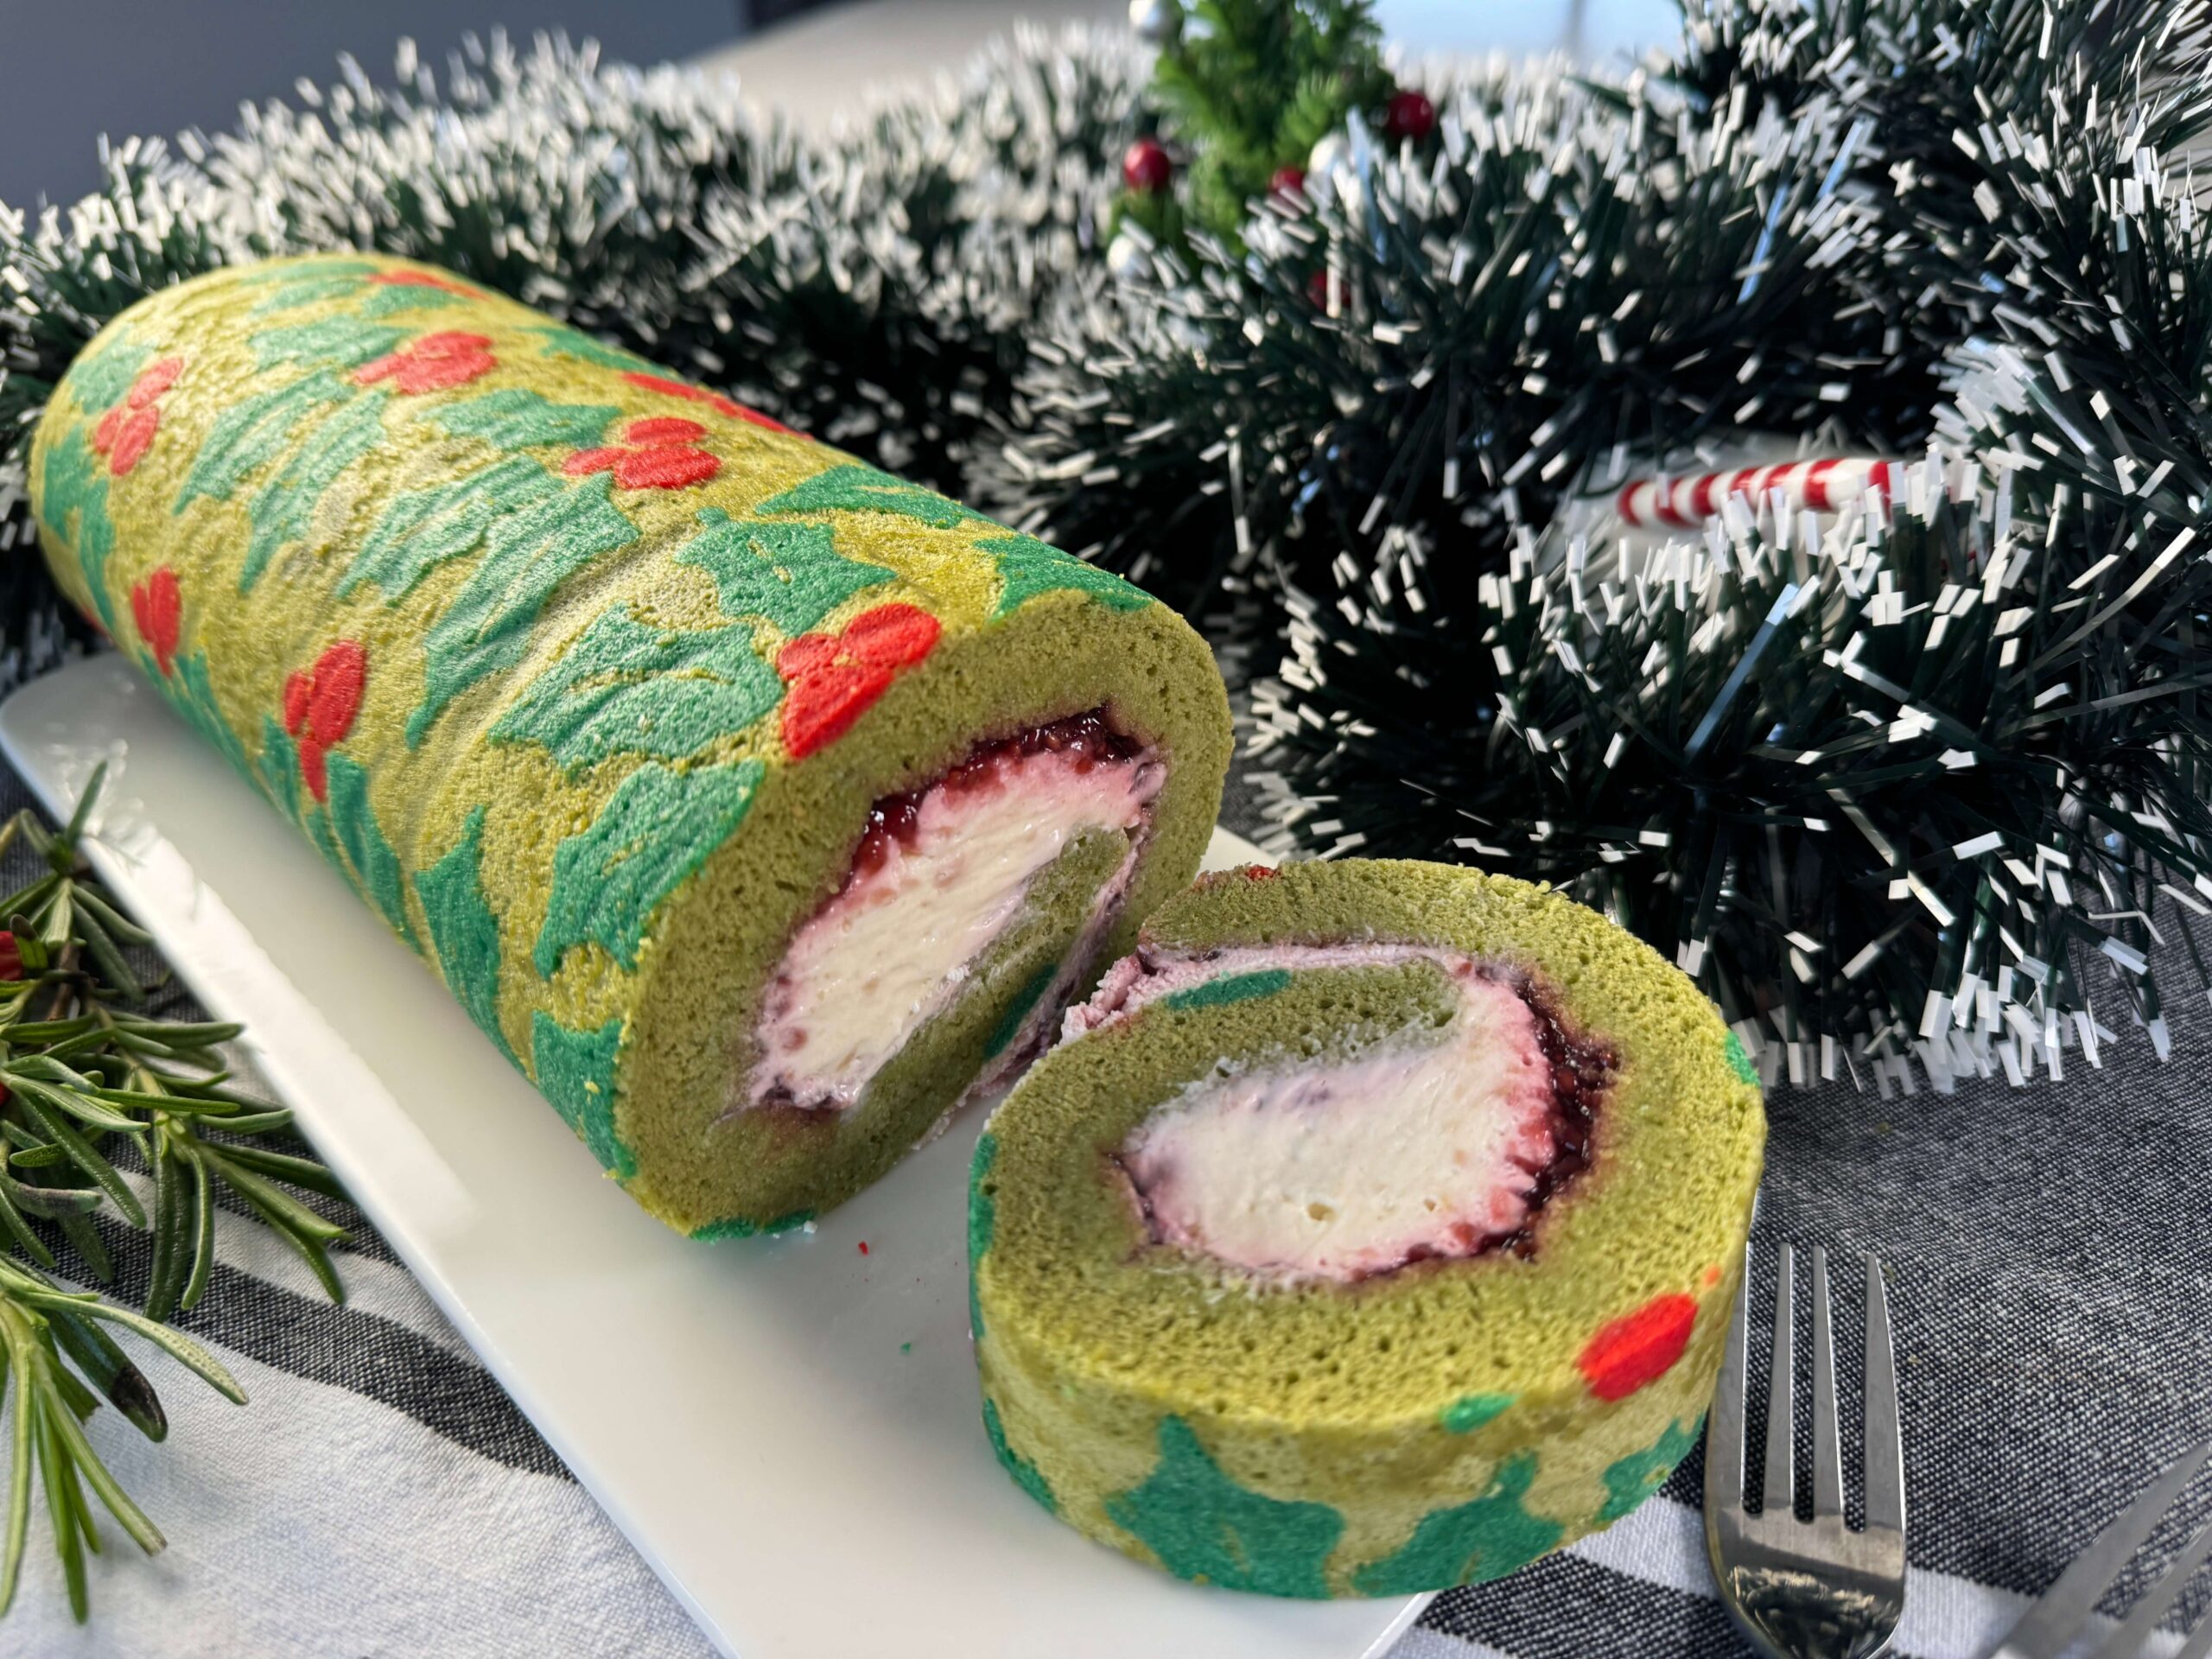
This Christmas pattern Swiss roll is a delicate matcha sponge cake, filled with fruity strawberry jam and airy whipped cream. Truly transport you to a world of pure Christmas fantasy.
Servings: 8 slices
Calories: 399kcal
Equipment
Ingredients
Pattern Batter
- 50 g unsalted butter softened
- 40 g icing sugar sifted
- 2 egg whites
- 50 g cake flour
- Kelly Green gel food colouring
- Green gel food colouring
- Super Red gel food colouring
Swiss Roll Cake Batter
- 5 egg yolks
- 40 g caster sugar
- 40 ml milk
- 40 ml vegetable oil
- ½ tsp vanilla extract
- 100 g cake flour
- 3 tsp matcha powder
- a pinch of salt
Meringue
- 5 egg whites
- 30 g caster sugar
- lemon juice a few drops
Instructions
Prepare the baking pan
- Spray some non-stick baking spray onto the baking pan and place the printed design in the middle of the pan.
- Line with parchment on top of the design.
Make the pattern batter
- Sift the icing sugar into a mixing bowl, then add the softened butter and beat them until the mix becomes lighter.
- Gradually add egg whites and continue to beat for about a minute or two.
- Sift in the cake flour and continue to beat the mixture until it becomes smooth.
- Then divide the batter into three portions.
- Add a few drops of green gel food colouring into 2 of the 3 portions of the batter while adding a few drops of red gel food colouring into the third portion.
- Pour each coloured batter into a separate piping bag and secure each with a silicone rubber band.
- Spray non-stick baking spray onto the parchment paper to prevent the pattern sticking onto it after it has been baked.
- Pipe the design onto the parchment paper.
- Once you are happy with the design, place the pan in the freezer to let the pattern go firm.
Make the Swiss roll cake batter
- Sift the flour, matcha powder and salt into a mixing bowl and mix well with a spatula. Set aside.
- Separate the eggs, place the whites into a large mixing bowl and the yolks into a medium mixing bowl.
- Add the sugar into the yolks. Beat at medium speed with a hand-held mixer until it doubles in volume.
- Add milk, vegetable oil and vanilla extract. Continue to mix until everything is well combined.
- Sift in the sifted dry ingredient mixture. Mix with a hand-held mixer at medium low speed until it becomes a smooth batter.
- Use a spatula to do a final mix to make sure everything is well combined.
- Preheat the oven at 165℃.
Make the meringue
- Add a few drops of lemon juice into the egg whites. Whisk at medium speed until a layer of foam is formed on the surface.
- Then gradually add in the sugar, around one-third at a time. Allow a minute in between each addition to let the sugar dissolve before adding the next portion.
- Once all the sugar is added, turn the mixer to medium high speed and continue to whisk the egg whites until a stiff peak forms (meaning there is a firm peak when you pull the meringue out using the whisk).
- Scoop a small amount of meringue into the cake batter to loosen it for easier mixing.
- Scoop ⅓ of meringue at a time and gently fold into the cake batter using a whisk.
- Gently fold each portion in completely (you can't see any white blobs) before adding the next portion.
- When all the meringue is folded in, use a spatula for a final gently mix to make sure everything is well combined.
- Scoop a small amount of the batter in a small piping bag and secure it with a silicone rubber band.
Bake and roll the cake
- Take the firmed pattern from the freezer and remove the original design template from under the parchment paper.
- Pipe the cake batter into the gaps inside the leaves, if you have left them, to make the gaps are well filled.
- Pour the cake batter onto the pattern.
- Use an offset spatula to even out the surface.
- Drop the pan (from the height of a few inches) a few times against the work surface to get rid of any big air bubbles trapped inside the batter.
- Bake the cake in the preheated oven for about 10 to 11 minutes or until a skewer inserted in the centre comes out clean.
- Once the cake is done, take it out from the oven immediately.
- Remove the cake from the pan when you can handle it by hand (be careful) and peel off the parchment paper on the sides.
- Place a new sheet of parchment paper on top and flip it over. Peel off the baked parchment paper.
- Get a clean tea towel ready on the side. Place a new sheet of parchment paper on top of the patterned side. Flip the cake over again.
- With the help of the parchment paper, start rolling the cake into a log. Wrap it with the tea towel which will keep the cake moist and soft.
- Once the cake is rolled, let it cool down completely on a wire rack with the seam down.
Prepare the filling
- Before whipping the cream, chill the mixing bowl in advance.
- Add a pinch of salt in the icing sugar, mix it and set it aside.
- Sift the icing sugar mixture in the chilled mixing bowl, add in the chilled double cream and vanilla extract.
- Whisk at medium-high speed until it foams soft peaks. This is a peak that forms but won't hold itself upright as the stiff peak will do. Soft peak condition is the best consistency for the filling.
- Cover it with a lid or cling film and pop it back to the fridge until needed.
Assemble and serve the cake
- Unroll the cooled cake and peel off the parchment paper inside.
- Spread a layer of strawberry jam onto the cake, scoop on the whipped cream in an even layer over the cake. Try to fill more in the centre of the roll so that we will have a very full round cake.
- Use the parchment paper to help roll the cake back and wrap it with the parchment paper and the tea towel. Place the filled roll cake in the fridge to set for an hour.
- Take the cake out from the fridge and unroll it. Use a sharp knife to slice off both ends to make it look neat.
- Serve on your desired serving plate. Slice it and taste a little piece of heaven.
Video
Notes
- To create a sense of dimension in the leaves, I leave a gap in the middle which I fill up with matcha cake batter. But if you find that is difficult, do not pipe the middle gap, just fill the whole design with the pattern batter. It will still look great.
- Choice is entirely up to you for the cake filling. I just like these festive colours but all sorts of fillings will work.
- If you do not have both Kelly Green and Forest Green gel food colouring, either one can get the job done.
- The cake can be kept in an air-tight container in the fridge for up to 3 days (although it rarely lasts that long in our house).
- Watch my video tutorial to see how I make the cake in action.
Nutrition
Serving: 1slice | Calories: 399kcal | Carbohydrates: 50.3g | Protein: 8.1g | Fat: 18.4g | Saturated Fat: 8.5g | Cholesterol: 137mg | Sodium: 92mg | Potassium: 101mg | Fiber: 0.9g | Sugar: 14.4g | Vitamin D: 21mcg | Calcium: 37mg | Iron: 2mg