Share this!
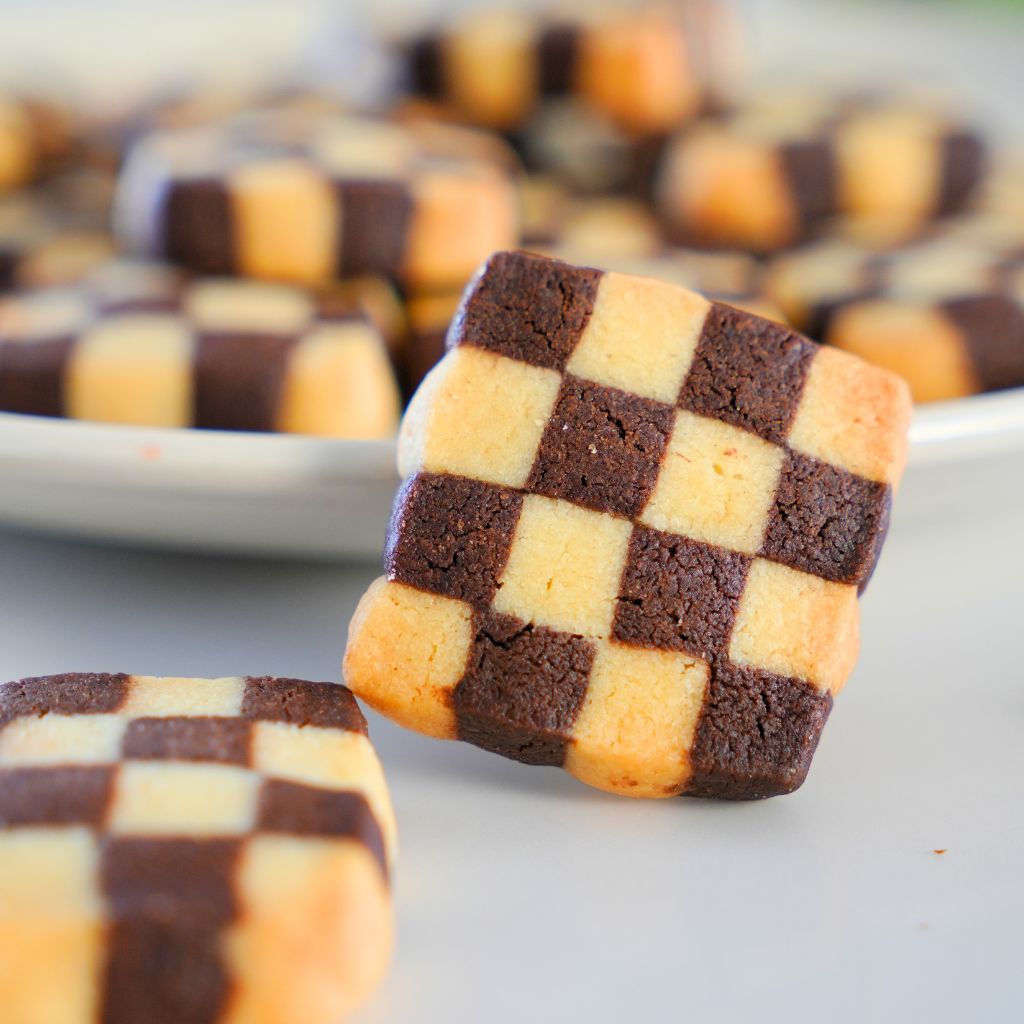
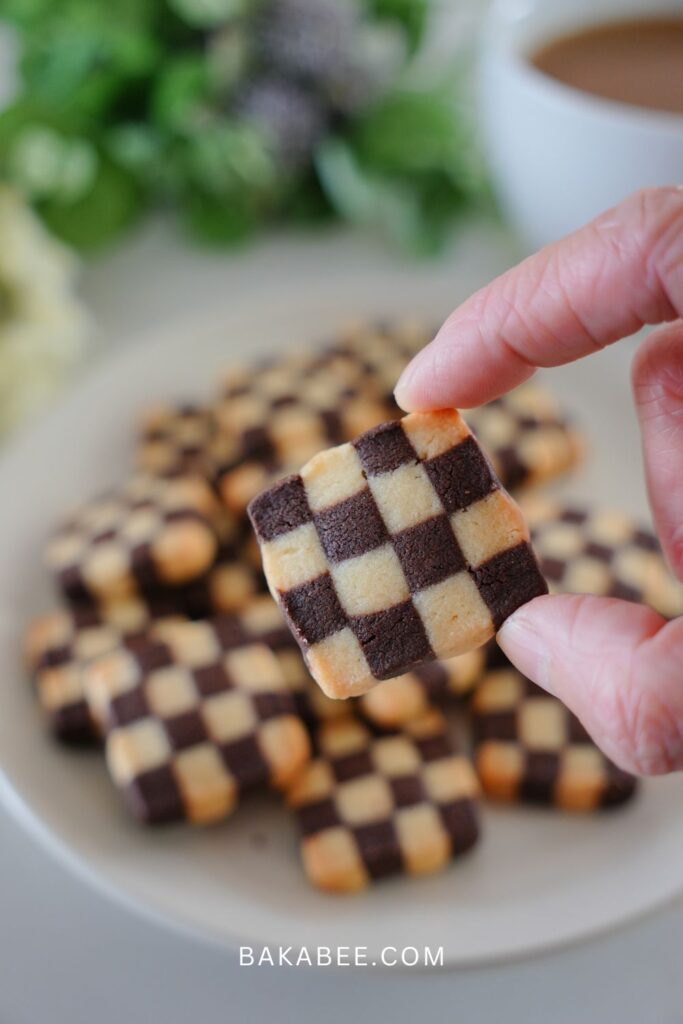
There’s something extra special about cookies that look as good as they taste — and these checkerboard cookies do exactly that.
With their crisp edges, buttery texture, and striking vanilla-and-chocolate pattern, they’re as delightful to make as they are to share. While they may look intricate, the process is simpler than you might think, and the result is a batch of cookies that always impress.
Whether you’re baking for the holidays, a gift box, or just a cozy afternoon treat, I’m sure these checkerboard cookies are sure to be a hit.
Let’s get started!
Why you’ll love this recipe
- Visually Stunning – The classic checkerboard pattern makes these cookies a total showstopper with minimal effort.
- Perfect Texture – Buttery, crisp edges with a tender bite—ideal for pairing with a cup of tea or coffee.
- Two Flavours in One – Enjoy the best of both worlds with rich chocolate and fragrant vanilla in every bite.
- Fun to Make – Assembling the pattern is like edible puzzle-making—super satisfying and surprisingly easy.
- Great for Gifting – These cookies hold their shape beautifully and look impressive in any cookie box or festive tin.
- Make-Ahead Friendly – The dough can be chilled or frozen in advance, making it perfect for busy schedules or holiday prep.
Check out the video tutorial
My go-to favourites
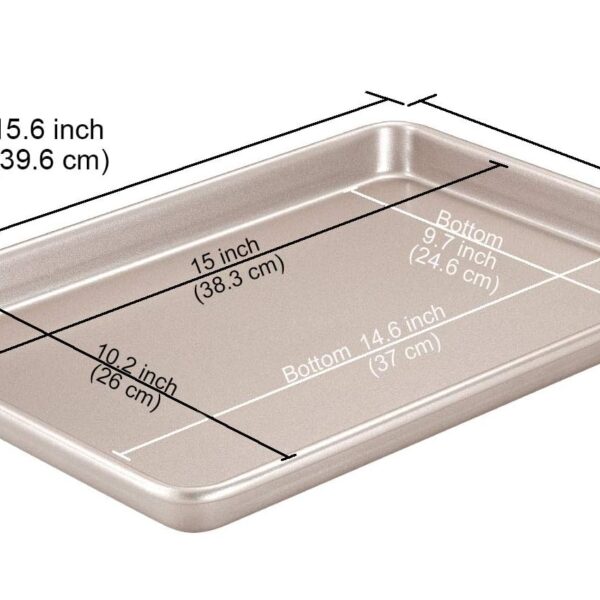 Buy Now →
  Buy Now →
 Ingredients in this Checkerboard Cookies recipe

At a glance: Here is a quick snapshot of what ingredients are in this recipe. Please see the recipe card below for specific quantities.
- Unsalted Butter, Softened: Butter is the heart of these cookies—it adds richness, flavour, and that tender, melt-in-your-mouth texture. Using unsalted butter lets you control the salt in the recipe for a perfectly balanced taste.
- Icing Sugar: It dissolves quickly and helps create a smooth, delicate crumb. It gives the cookies a fine, almost shortbread-like texture without any graininess.
- Egg Yolk: It adds richness and helps bind the dough. It also contributes to a tender texture and a slightly golden colour once baked.
- All-Purpose Flour: It provides structure and stability to the cookies, helping them hold their checkerboard shape when baked.
- Salt: It enhances the flavours, especially the sweetness and the depth of the cocoa. It brings balance to the dough.
- Cocoa Powder: It gives half of the dough its deep chocolate flavour and colour. It’s what creates the striking contrast in the checkerboard design.
- Vanilla Extract: Vanilla adds warmth and aroma to the vanilla portion of the dough, rounding out the flavour and complementing the cocoa beautifully.
How to make Checkerboard Cookies
Here are some key tips for making the perfect Checkerboard Cookies ! Be sure to scroll down to the printable recipe card for the ingredient amounts and watch my step-by-step video tutorial for a complete guide to learn how to make them.

- Add salt to the flour.
- Mix well and set aside.
- Combine butter and icing sugar. Mix by hand initially.
- Mix until combined.

- Beat the mixture with a handheld mixer at medium speed.
- Until the mixture light and fluffy.
- Add the egg yolk and vanilla extract.
- Beat until they are incorporated.

- Sift in the flour mixture.
- Roughly mix the flour mixture in by hand to prevent it flying everywhere.
- Beat until just combined.
- Bring everything together using a spatula.
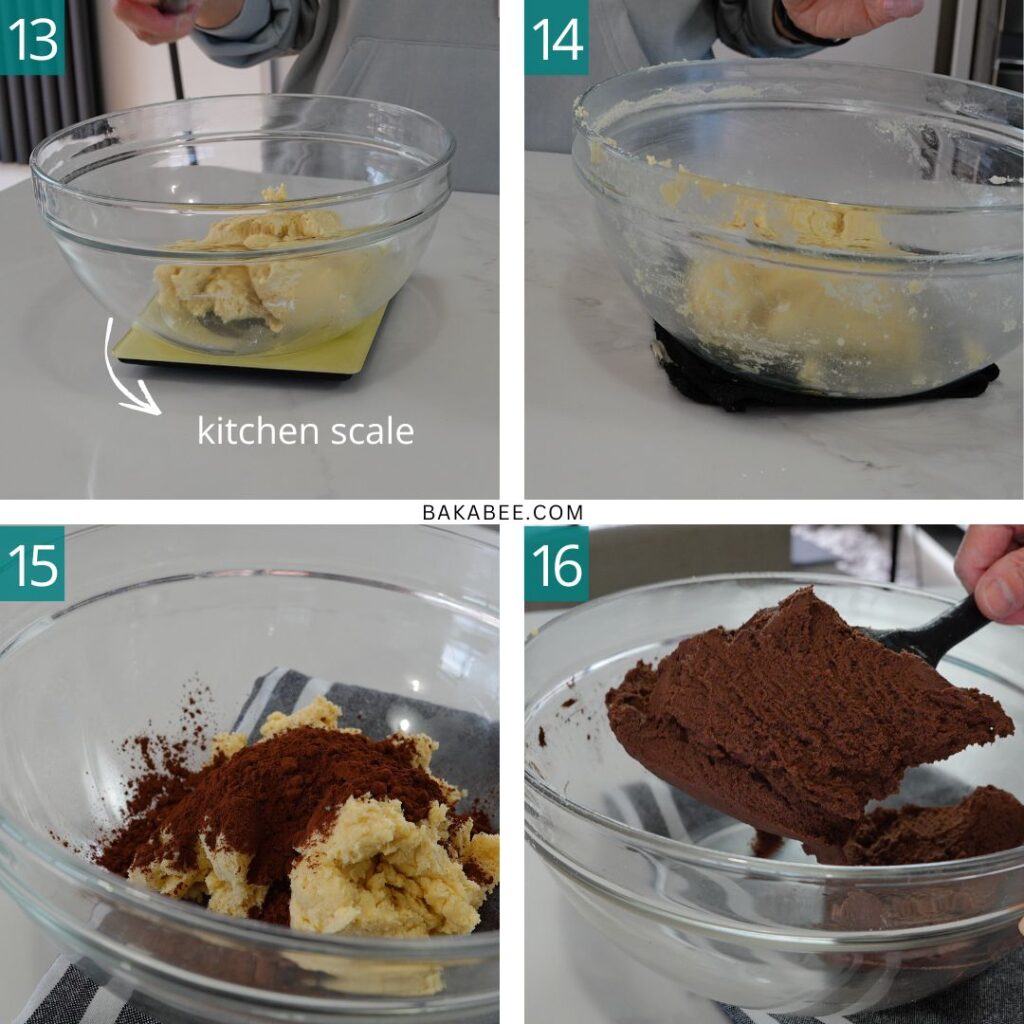
- Weigh the dough using a kitchen scale.
- You will have two equal portions.
- Add cocoa powder into one portion.
- Mix until the cocoa powder is fully mixed using a spatula. Mix by hand to prevent over-mixing.

- Sandwich the vanilla dough between two sheets of parchment.
- Roll it to 6 mm thickness.
- Meanwhile, roll the dough into 22 x 22 cm square.
- Use a dough scraper to help shaping the dough into a square.

- Repeat the same process for the cocoa dough.
- Roll the dough into 6 mm thick, 22 x 22 cm square.
- Try your very best to roll out both pieces into the same size and shape. They must have the same thickness.
- Place both dough on a baking pan and chill for at least an hour until firm.

- Brush a thin layer of egg white on top of the sheet of vanilla dough.
- Stack the cocoa dough on top, align them as neatly as you can.
- Cut the stacked dough in half with a sharp knife.
- Brush a thin layer of egg white on top of one half.
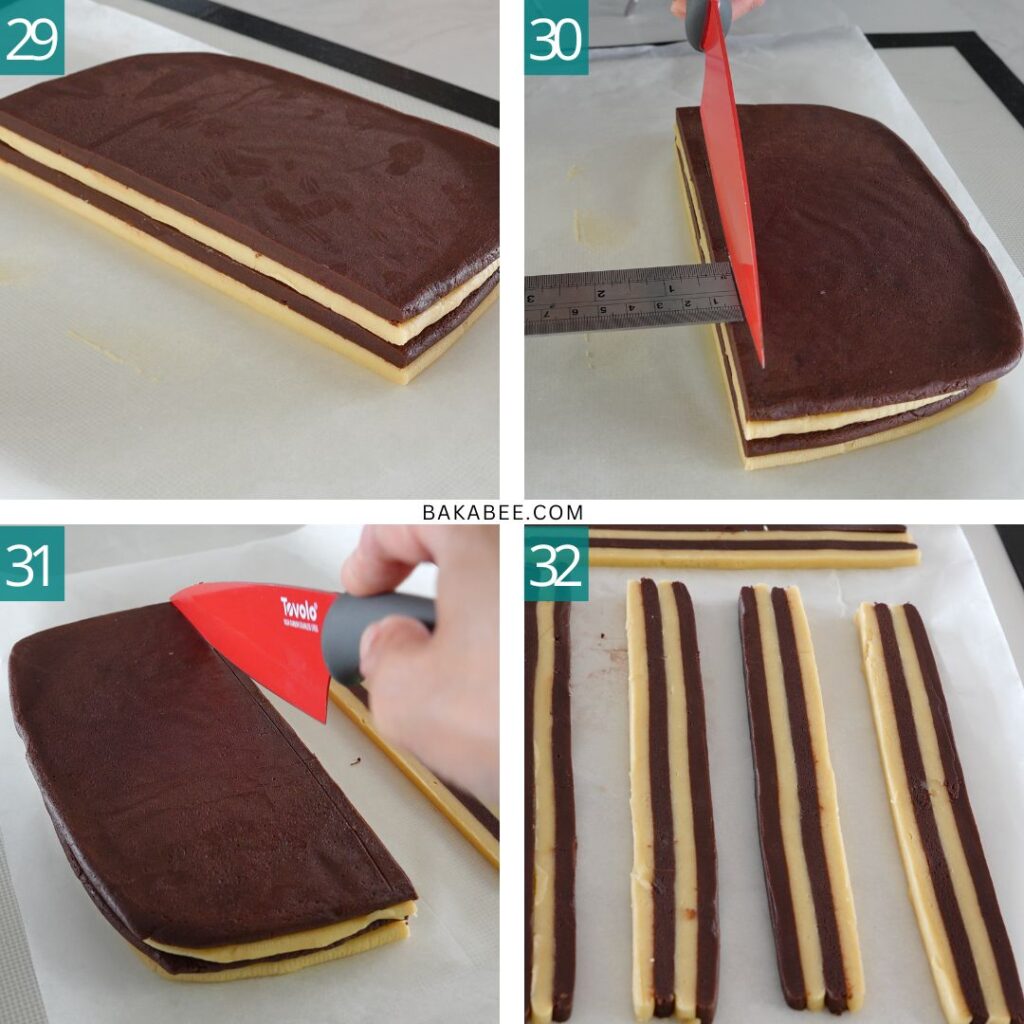
- Place the other half on top to create more layers.
- Measure strips from your dough stack to a 6 mm thickness.
- Cut strips from your dough stack.
- You should get 12 strips from the dough stack. Chill them for 30 mins or until firm before assembly.
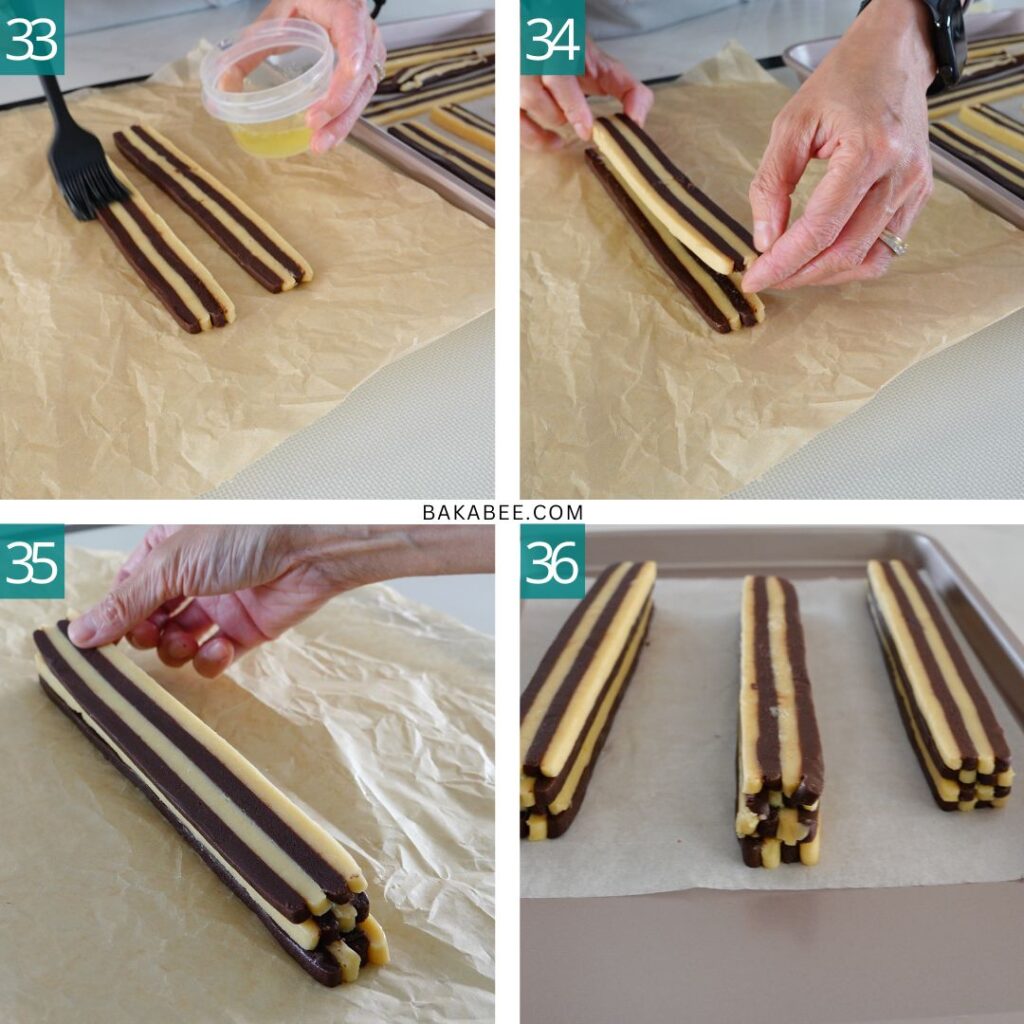
- Brush a thin layer of egg white on one strip.
- Stack another strip on top with the opposite colours to start creating the checkerboard pattern.
- Repeat the same process, alternating colours, until you have a block of 4 layers, made up from 4 strips. Continue to build 2 more blocks of 4 layers by using the 8 remaining strips.
- Place the three blocks on a lined baking pan and chill for an hour for easy slicing.
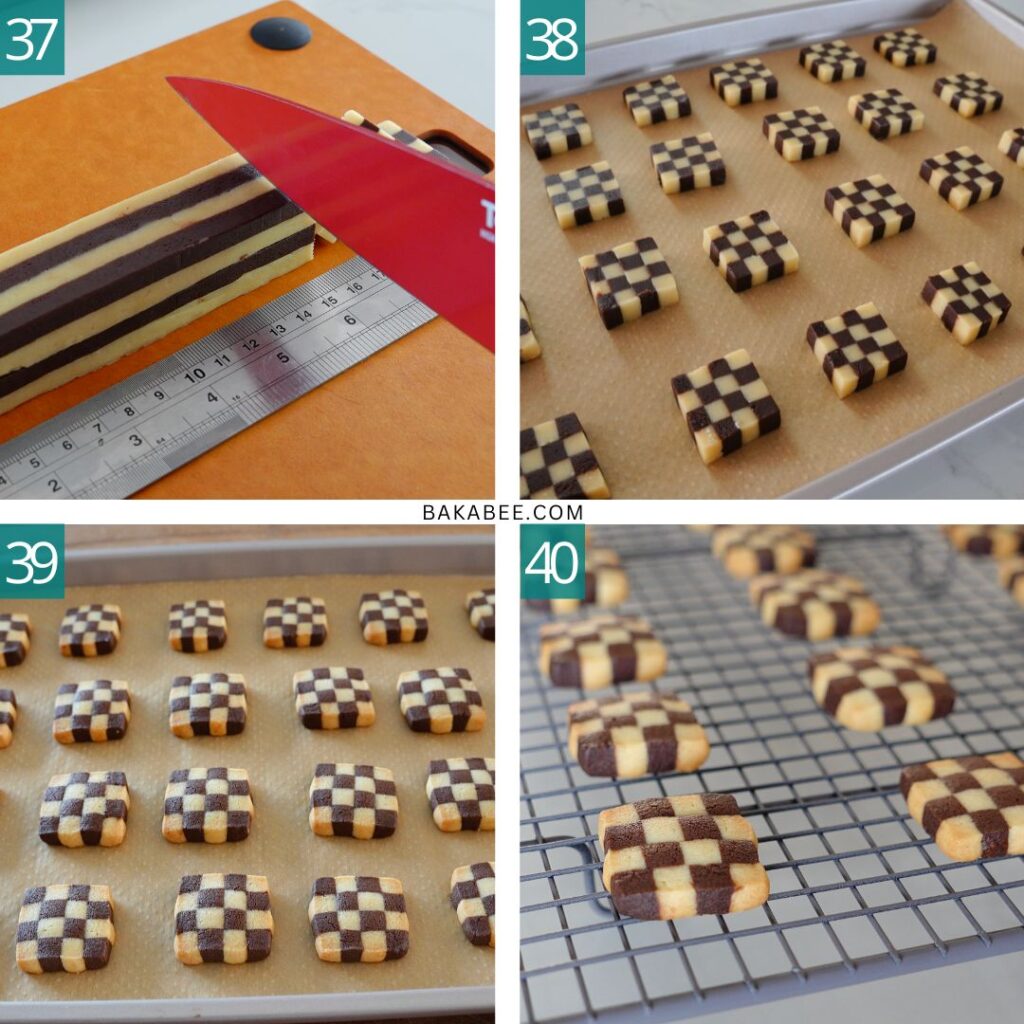
- Use a ruler and cut each cookie about 6 mm thick as you work down the block.
- Place each slice on a lined baking pan with a little space.
- Bake the sliced cookies in the preheated oven at 170°C (325°F) for 12 – 15 mins or until the edges begin to slightly brown. Once done, let the cookies sit on the pan for 5 minutes
- Transfer them onto a wire rack to cool completely. Enjoy with a cup of coffee!
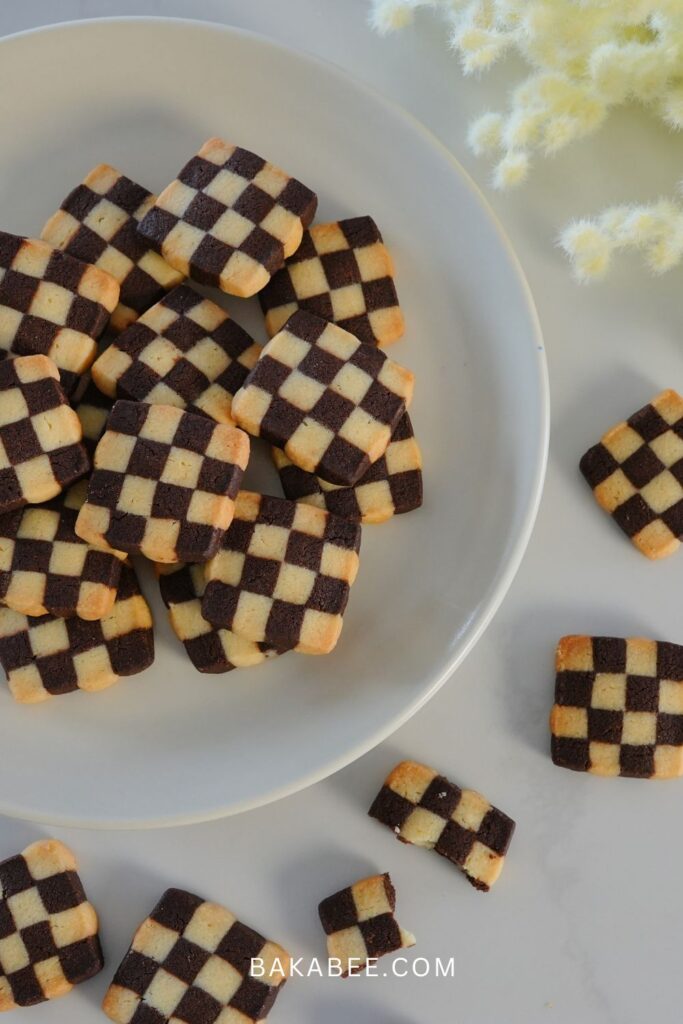
Tips for making the BEST checkerboard cookies
- Soften your butter properly: Make sure your butter is soft but not melted. It should be pliable to cream smoothly with the sugar—this ensures a tender, even-textured cookie.
- Measure your ingredients accurately: Use a digital scale if you have one! Precision is key when it comes to baking, especially for dough that needs to hold its shape.
- Don’t skip chilling the dough: Chilling firms up the dough, making it easier to slice cleanly and helps the cookies maintain their sharp checkerboard edges while baking.
- Use a sharp knife for clean cuts: When slicing the dough, a sharp knife (not serrated) will give you those clean, crisp lines that make the checkerboard pattern pop.
- Brush egg white lightly and evenly: Egg white acts as the “glue” between dough layers—just a thin layer will do. Too much can make the dough slippery or bake unevenly.
- Line up the dough carefully: Take your time when stacking or assembling the dough strips. Neat alignment ensures a uniform checkerboard look in every cookie.
How to serve
- Cookie Gift Boxes: Arrange them neatly in a decorative box or tin lined with parchment paper. Add a ribbon or tag for the perfect homemade gift!
- Afternoon Tea Treat: Serve them alongside a pot of tea, coffee, or hot chocolate. Their crisp texture and rich flavour pair beautifully with warm drinks.
- Festive Cookie Jars: Stack them in a clear jar for a charming kitchen display (and an easy snack). Great for holiday tables or cozy get-togethers!
- Edible Place Settings: Individually wrap cookies in clear bags and place them on plates as edible name cards for dinners or celebrations.
How to store
- Room Temperature: Once fully cooled, store the cookies in an airtight container at room temperature. They’ll stay fresh and crisp for up to 1 week.
- Freezing the dough block: Checkerboard cookies freeze beautifully! Place them in a freezer-safe container or zip-top bag with parchment between layers. Freeze for up to 2 months. When ready to enjoy, let them thaw at room temperature for about 15–20 minutes or until it’s sliceable but still firm. Slice and bake as instructed in the recipe.
Frequently Asked Questions
Icing sugar gives these cookies a smooth, tender texture. Using granulated sugar might result in a slightly grainier and firmer cookies.
Yes! Chilling helps firm up the dough, making it easier to slice and helping the cookies keep their sharp checkerboard edges when baked.
Absolutely! The dough can be made and refrigerated up to 3 days ahead or frozen for up to 2 months.
The dough may have been too soft or warm when sliced or baked. Be sure to chill it well before cutting and again before baking if needed.
They’re crisp and buttery, with a delicate snap when you bite into them — perfect with a cup of tea or coffee.
More cookie recipes you might like
Did you make this recipe?
Let me know if you try out this recipe – I love seeing your creations! Tag me on Instagram @bakabeecom and be sure to leave me a comment / ⭐️⭐️⭐️⭐️⭐️ rating below!

Checkerboard Cookies
- Author: Bakabee
- Prep Time: 30 mins
- Chill Time: 2 hours
- Cook Time: 12 mins
- Total Time: 2 hours 42 mins
- Yield: 72 cookies 1x
- Category: Cookies, Afternoon Tea, Snacks
- Method: Bake
- Cuisine: European, Western
Description
These classic checkerboard cookies are as beautiful as they are delicious! Made with buttery vanilla and chocolate dough, they bake to be crisp, tender, and full of flavour. Don’t be fooled by the striking pattern — they’re easier to make than they look and perfect for gifting, children’s parties, or simply treating yourself. The bite size pieces mean that you can allow yourself more than one at a time!
Ingredients
- 230 g unsalted butter, softened
- 100 g icing sugar
- 1 egg yolk
- 300 g all purpose flour
- 1/2 tsp salt
- 25 g cocoa powder
- 1 tbsp vanilla extract
Instructions
Preparation
- Preheat your oven to 170°C (325°F). Line a baking sheet pan with parchment paper.
- Well mix the salt with the flour in a mixing bowl. Set aside.
Make the dough
- In a mixing bowl, combine the butter and sugar. Mix by hand initially until combined. Then beat the mixture with a handheld mixer at medium speed until light and fluffy.
- Add the egg yolk and vanilla extract. Beat until they are incorporated.
- Add in the flour mixture. Beat until just combined.
- Weigh the dough and divide into two equal portions. (Total weight 632 g, 316 g each)
- Add cocoa powder into one portion. Mix until the cocoa powder is fully mixed using a spatula. Mix by hand to prevent over-mixing.
Roll the dough
- Sandwich the vanilla dough between two sheets of parchment. Roll until it is 22 x 22 cm, 6 mm thick.
- Repeat the same process for the cocoa dough. Try your very best to roll out both pieces into the same size and shape. They must have the same thickness.
- Refrigerate the dough for at least an hour until firm.
Assemble the dough
- Brush a thin layer of egg white on top of the sheet of vanilla dough and then stack the cocoa dough on top, align them as neatly as you can.
- Cut the stacked dough in half with a sharp knife (need to measure this).
- Brush a thin layer of egg white on top of one half. Carefully place the other half on top to create more layers. Feel free to chill the dough at any point if the dough starts to soften.
- Now you have a 4-layer dough stack in alternating colours.
- Next, cut strips from your dough stack to a 6 mm thickness which will create perfect squares (6mm by 6mm) for the pattern. You should get 12 strips from the dough stack.
- Chill the strips in the fridge for at least 30 mins or until firm.
- Brush a thin layer of egg white on one strip. Stack another strip on top with the opposite colours to start creating the checkerboard pattern.
- Repeat the same process (Step 7), alternating colours, until you have a block of 4 layers, made up from 4 strips. Set aside.
- Now continue to build 2 more blocks of 4 layers by using the 8 remaining strips.
- Place the three blocks on a lined baking pan and chill for an hour for easy slicing.
Bake the cookies
- To ensure even slices, use a ruler and cut each cookie about 6 mm thick as you work down the block. You should be able to cut 24 cookies per block, giving you a total of 72.
- Place each slice on a lined baking pan with a little space (they shouldn’t spread much at all).
- Bake the sliced cookies in the preheated oven at 170°C (325°F) for 12 – 15 mins or until the edges begin to slightly brown.
- Let the cookies sit on the pan for 5 minutes and then transfer them onto a wire rack to cool completely.
- Enjoy with a cup of coffee!
Notes
- Watch my video tutorial here to see how easy they are to make.
- Divide the whole dough into two equal portions, 632 g total weight, 316 g each.
- Roll both doughs into 6mm thickness, 22 x 22 cm square.
- Cut each strip into 6 mm
- The thickness of the dough will affect the size of the pattern. Feel free to experiment with different thicknesses and please send me a picture!
Thanks for joining me in the kitchen today. Hope you’ll love this! Enjoy and keep baking! 💛
Share this!

