Share this!
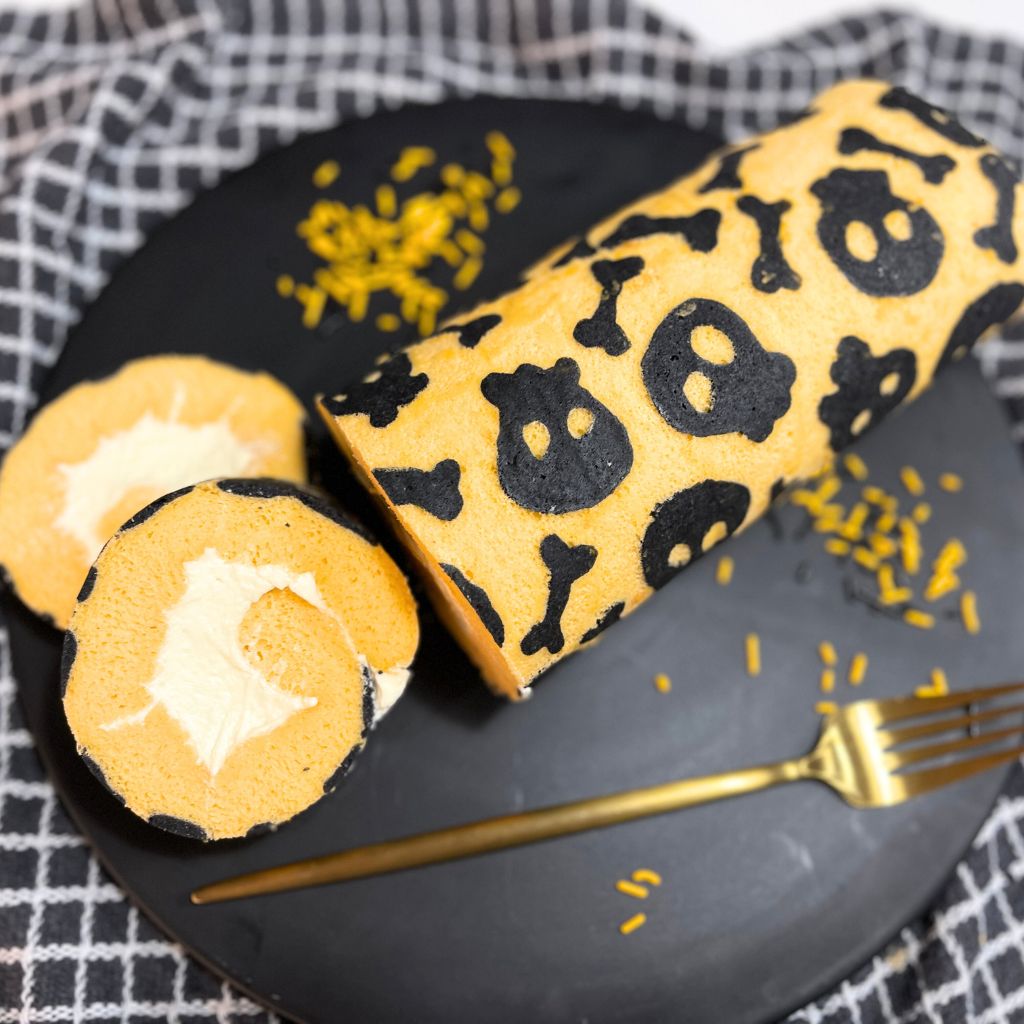
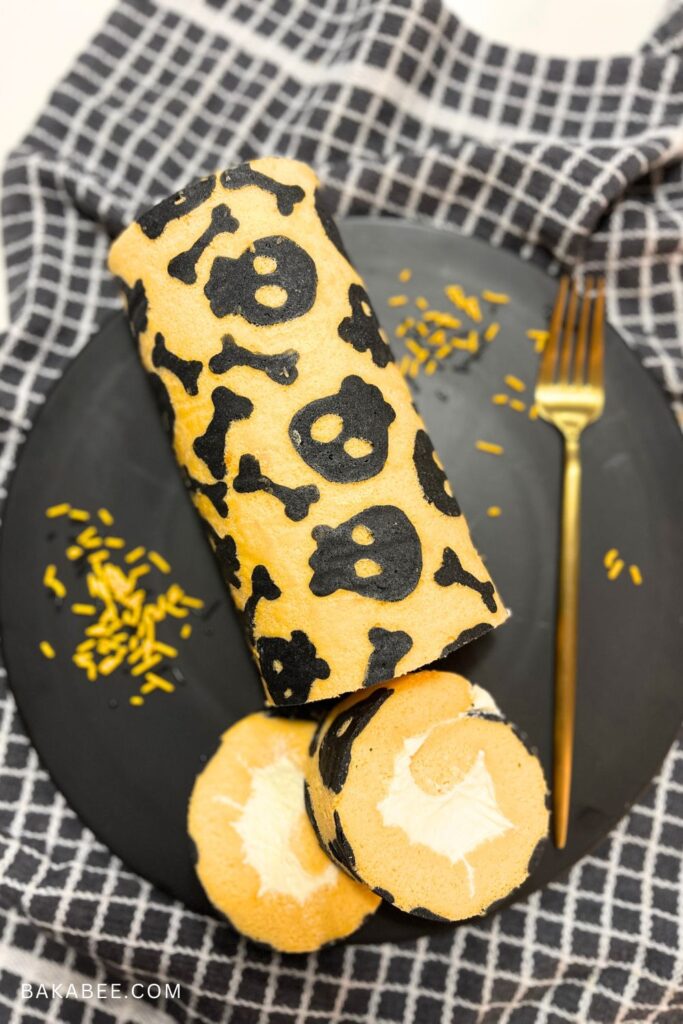
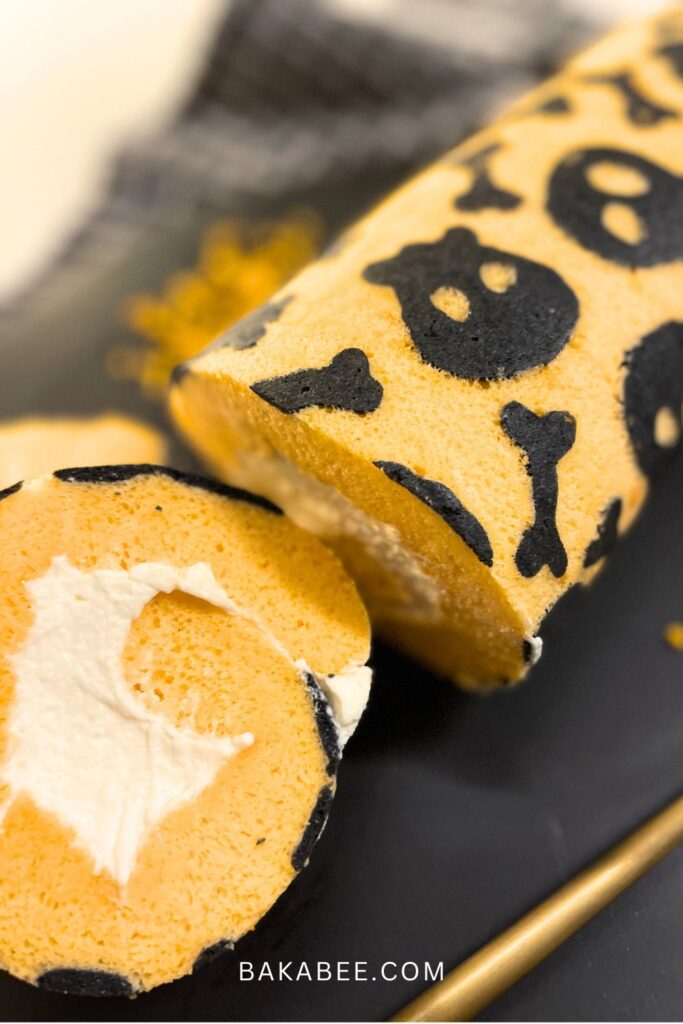
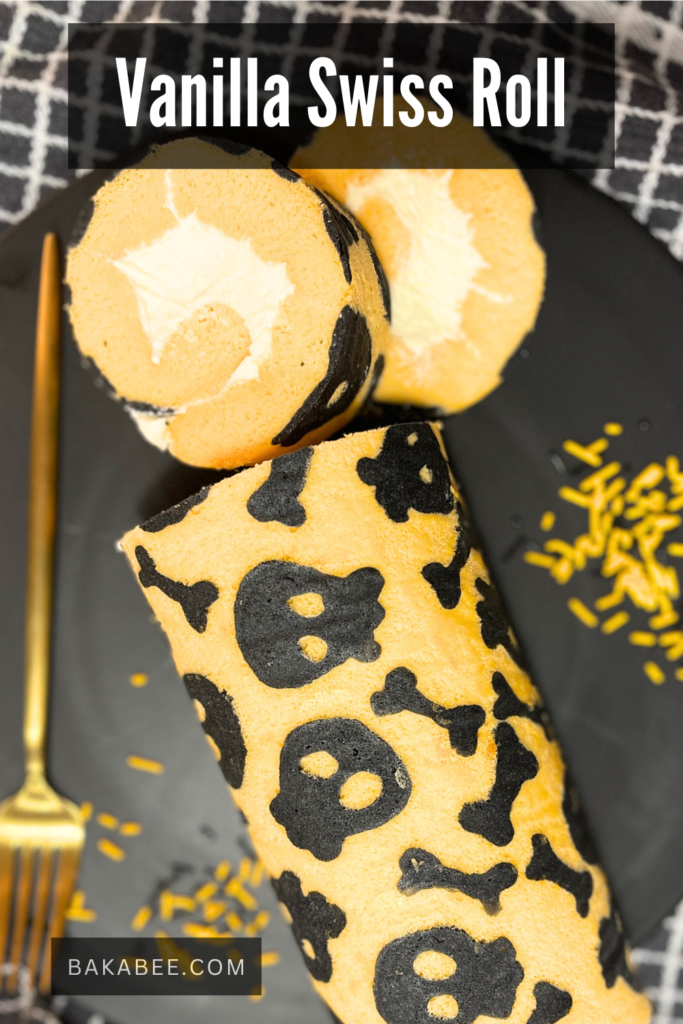
Are you ready to roll into the Halloween spirit with a delightful treat that’s as fun to make as it is to eat? This year, skip the store-bought sweets and impress your family and friends with a homemade Swiss roll featuring an adorable Halloween pattern! Picture a soft, fluffy sponge cake, elegantly rolled and filled with creamy goodness, but with a twist—decorated with cute skeleton and bone pattern that add a playful touch to your spooky spread. This charming dessert is perfect for Halloween parties, cozy nights in, or as a creative kitchen project with the kids. Get ready to whip up a hauntingly delicious, Instagram-worthy dessert that’s guaranteed to steal the show!
Let’s dive into this sweet adventure and make a bewitching Swiss roll that’s sure to enchant everyone who tries it.
How to design this Halloween pattern
I designed this Halloween pattern using Canva which is an online graphic design tool. You can use it to create social media posts, presentations, posters, videos, logos and more.
I subscribe to the Canva Pro version. This allows me to download any designs with a transparent background and their background remover function which is really useful for me. However, you are totally fine if you just sign up for their free version.
You can design anything with thousands of free templates, photos, fonts, and more using Canva. Bring your ideas to life with its drag-and-drop editor.
If you like my design, please feel free to download it by clicking the button below👇 for your Swiss roll baking. On the other hand, I do encourage you to design your own. It’s so much fun! 😄 When you see your own design comes to live, it’s not only exciting but also very satisfying!
Why you’ll love this Halloween pattern Swiss roll
- Fun and Creative: It gives you a fantastic opportunity to get creative in the kitchen. You can enjoy decorating and trying new baking techniques will love crafting and also a fun activity to do with kids or friends!
- Adorably Spooky Aesthetic: The skeleton and bone pattern adds a playful yet spooky touch to any Halloween gathering. It’s the perfect combination of cute and creepy, making it an eye-catching centerpiece that stands out from typical Halloween desserts.
- Deliciously Light and Fluffy: Beyond the festive appearance, this Swiss roll is soft, light, and fluffy, making it a delightful treat that’s not overly heavy. It tastes simply fantastic!
- Perfect for Halloween Parties: This dessert is surely an ideal choice for those looking to impress their guests with a homemade, themed treat at any Halloween party or gathering.
How to make Halloween Pattern Swiss Roll
Here are some key points for making the perfect Halloween pattern Swiss roll! Be sure to scroll down to the printable recipe card for the ingredient amounts and watch my step-by-step video tutorial for a complete guide to learn how to create this fun and festive dessert.
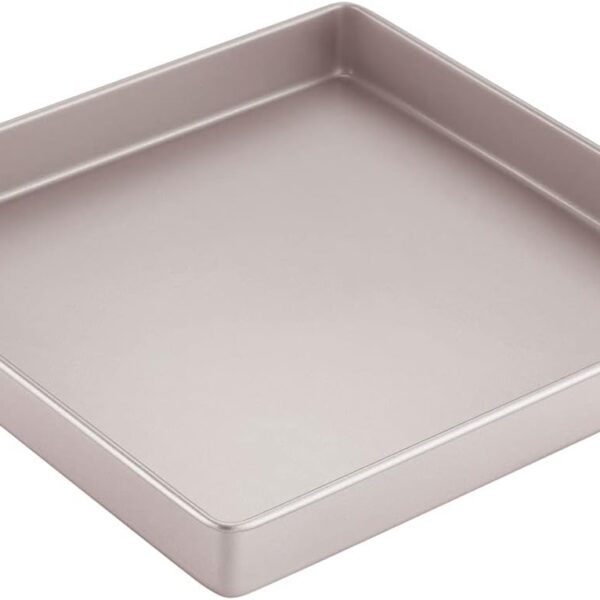
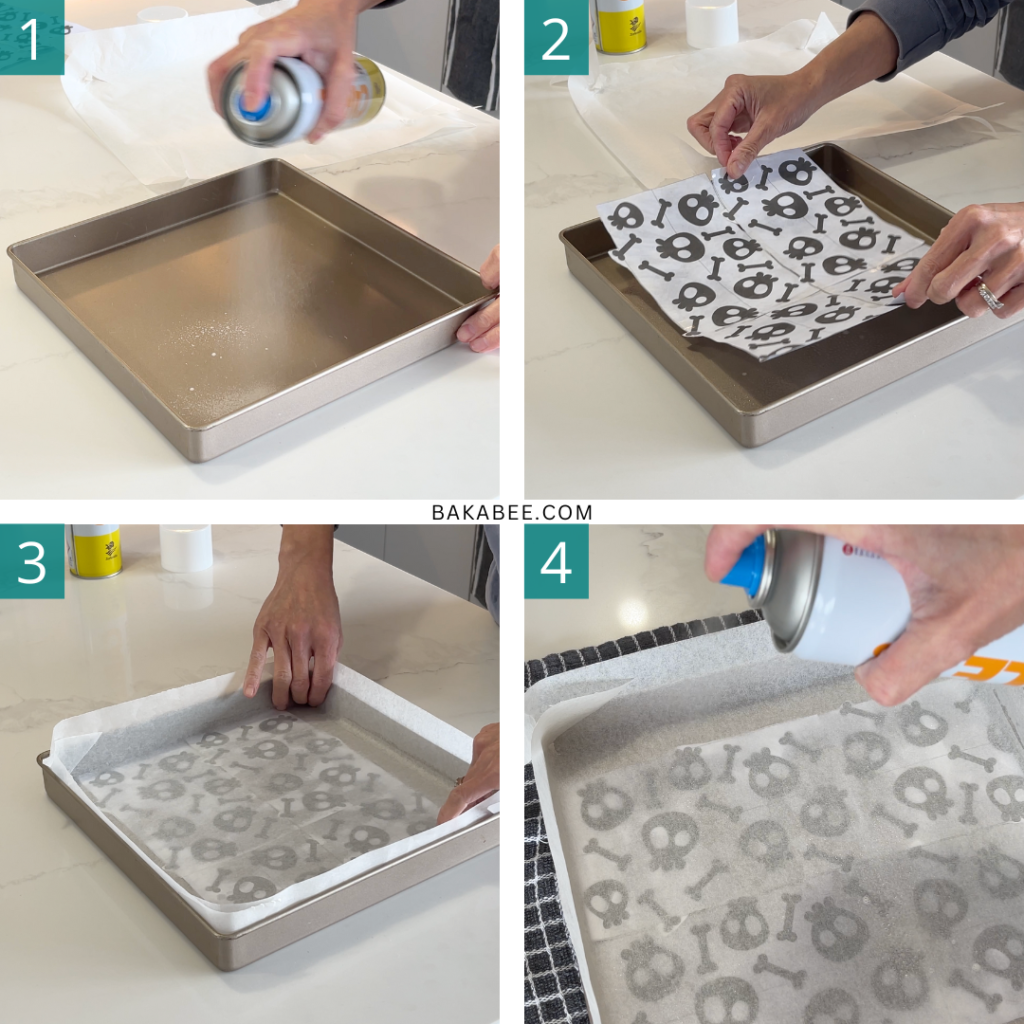
- Prepare the pan: Spray cake release spray on the baking pan.
- Place the Halloween pattern in the centre.
- Line it with the parchment paper on top.
- Spray a very thin layer of cake release spray onto the parchment paper and wipe off any excess with a kitchen towel if needed.
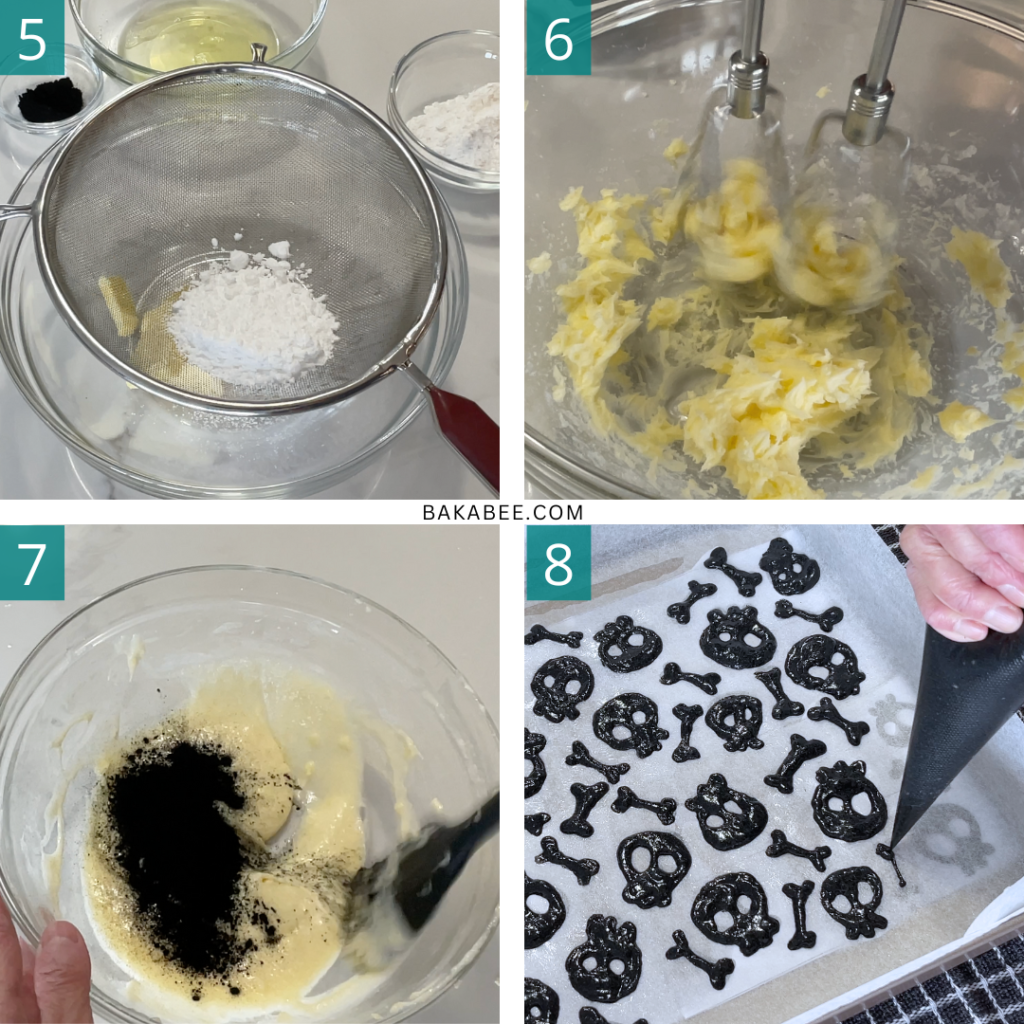
- Prepare the pattern batter: Sift in the icing sugar before beating with the butter.
- Beat the butter and icing sugar mixture and the rest of the ingredients.
- Once the batter is done, add in the activated charcoal powder.
- Load the black batter in a piping bag and start piping following the template underneath. Place the baking pan in the freezer until the pattern is firm.
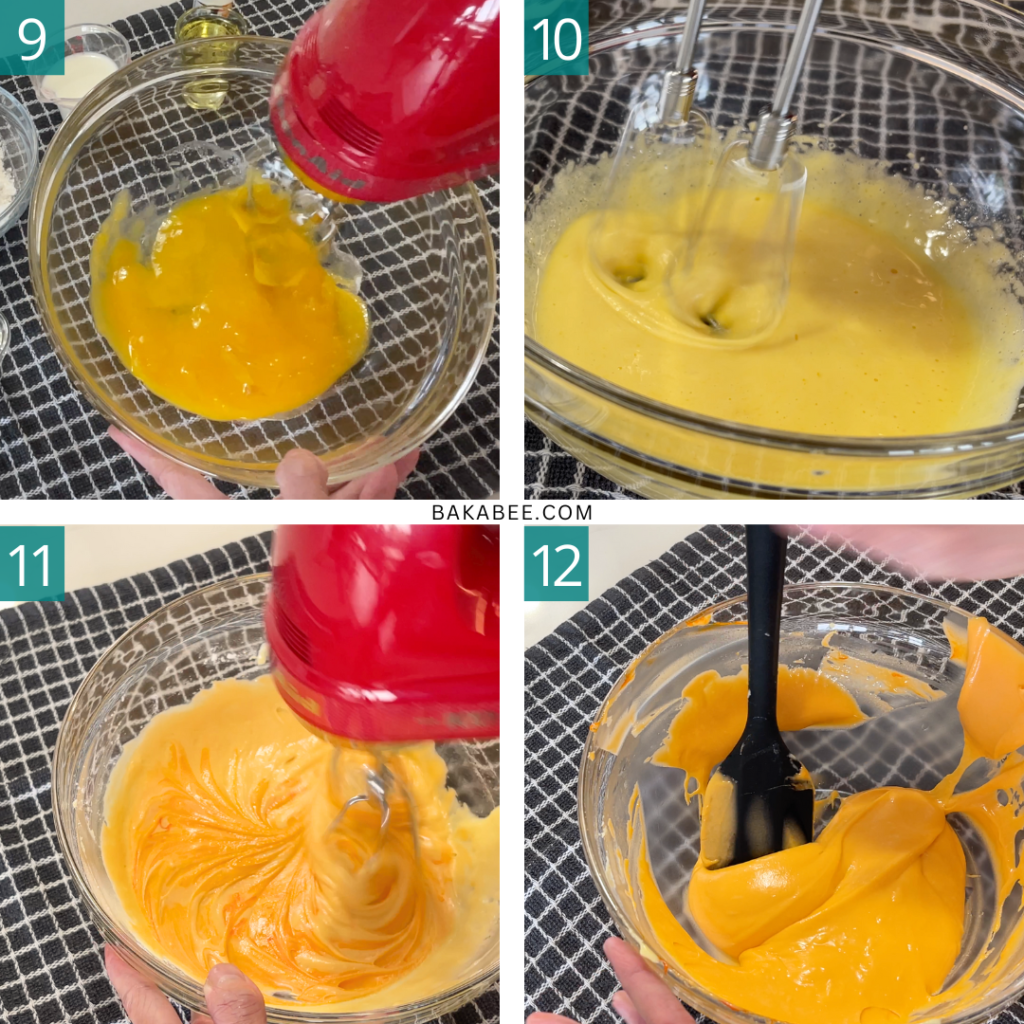
- Prepare the cake batter: add sugar in the egg yolks and beat them until pale and double in volume.
- Add the rest of the ingredients and beat until the mixture becomes a smooth batter
- Add a few drops of orange gel food colouring to the batter and mix well until you are happy with the colour.
- Scrape around the bowl to make sure everything is well mixed.
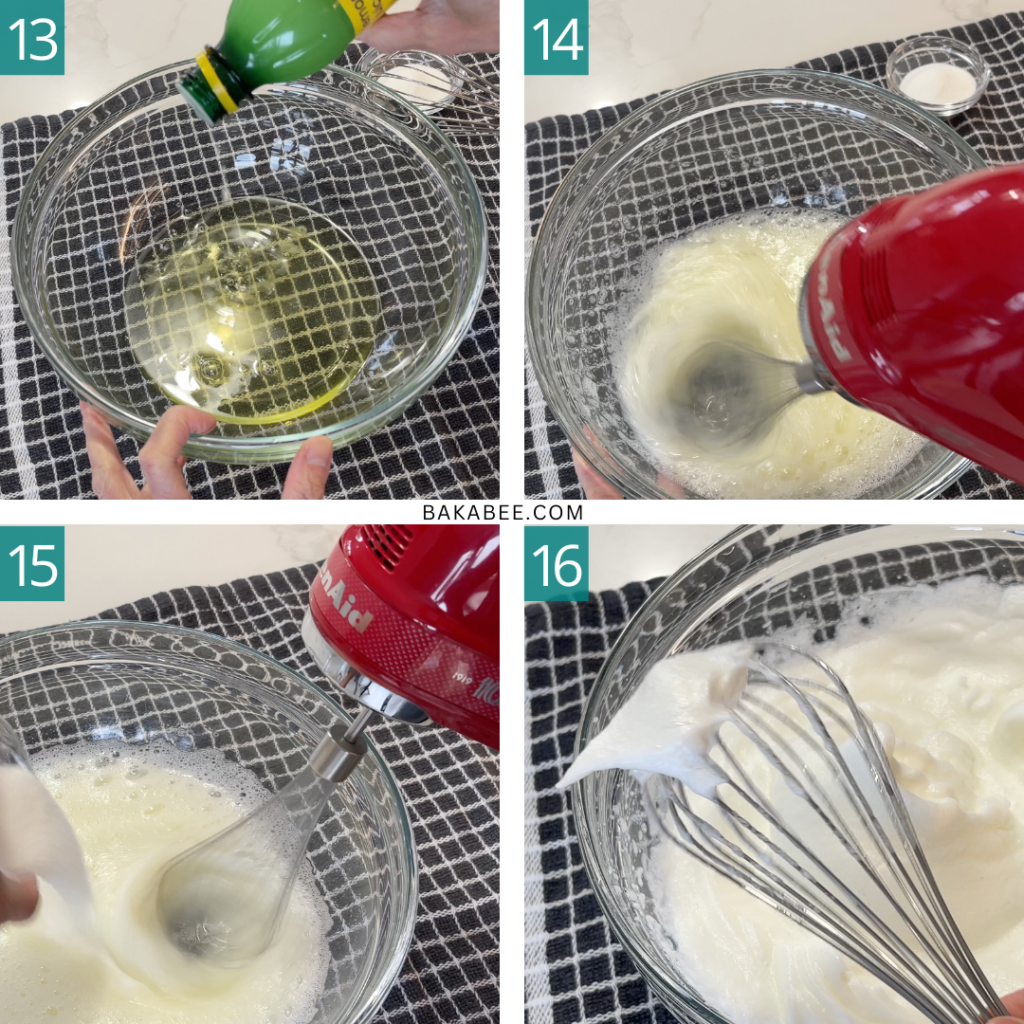
- Prepare the egg whites: add in a few drops of lemon juice to stabilise them. You can also use vinegar or cream of tartar.
- Whisk egg whites until foamy on the surface.
- Add in 30 g caster sugar in three stages, give it 30 seconds or 1 minute in between to let the sugar dissolve before adding the next.
- Turn the mixer at medium-high speed and continue to whisk the egg whites until stiff peaks.
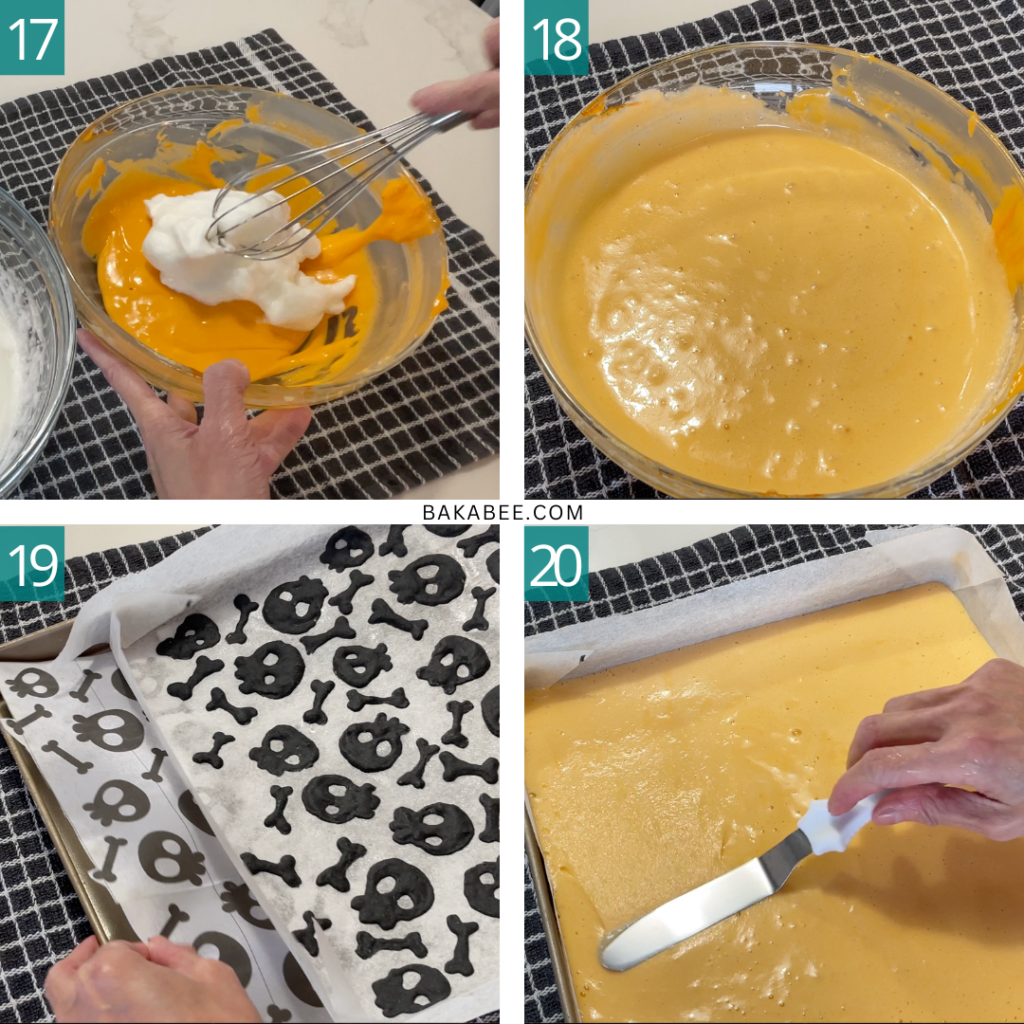
- Combine the cake batter with the beaten egg whites: scoop a small amount of beaten egg whites into the cake batter to loosen its texture first.
- Scoop one-third of the meringue at a time and gently fold into the cake batter using a whisk.
- Take the firmed pattern from the freezer and remove the original design template from under the parchment paper.
- Pour the cake batter onto the pattern batter. Use an offset spatula to even out the surface.
- Reveal the pattern: once the cake is done, remove the cake from the pan and peel off the parchement paper on the sides.
- Place a new sheet of parchment paper on top and flip it over.
- Peel off the baked parchment paper to reveal the pattern.
- Place a new sheet of parchment paper on top of the patterned side. Flip the cake over again so the pattern is facing down.
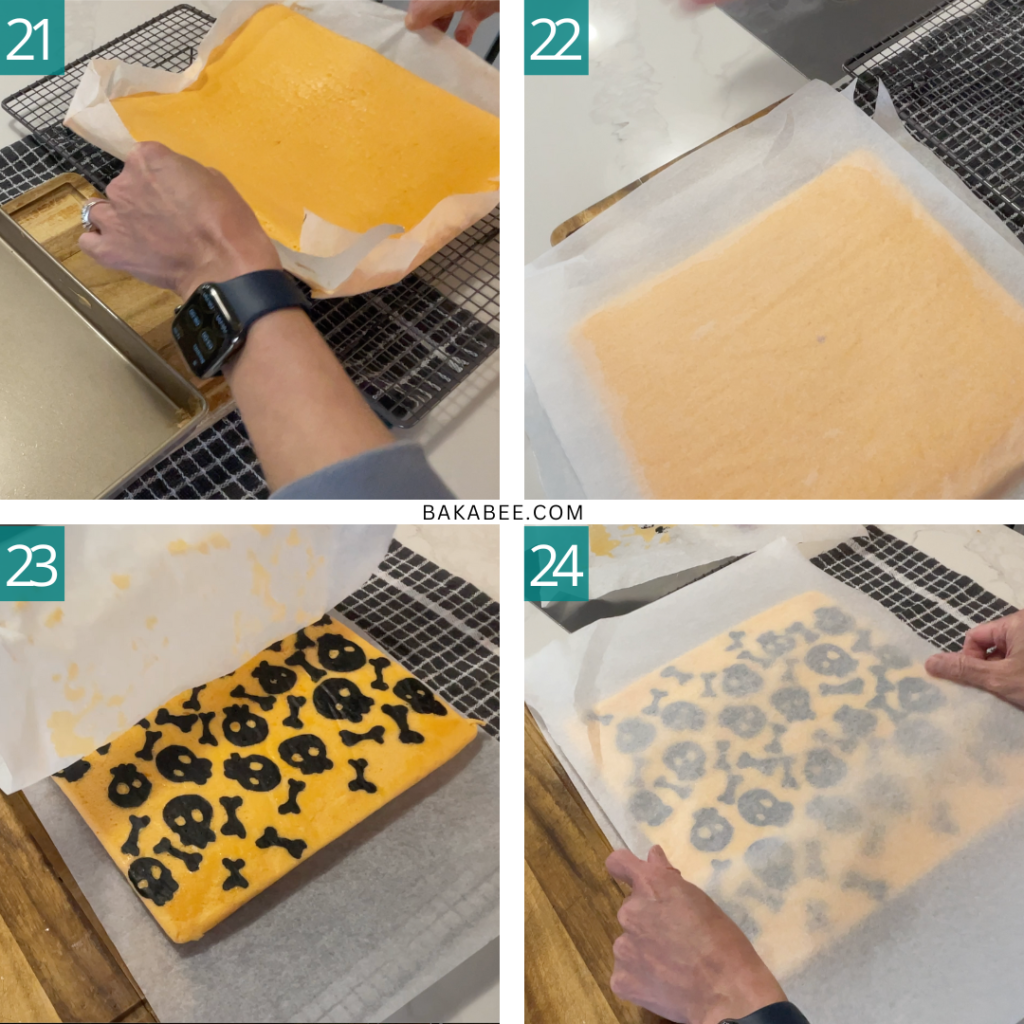
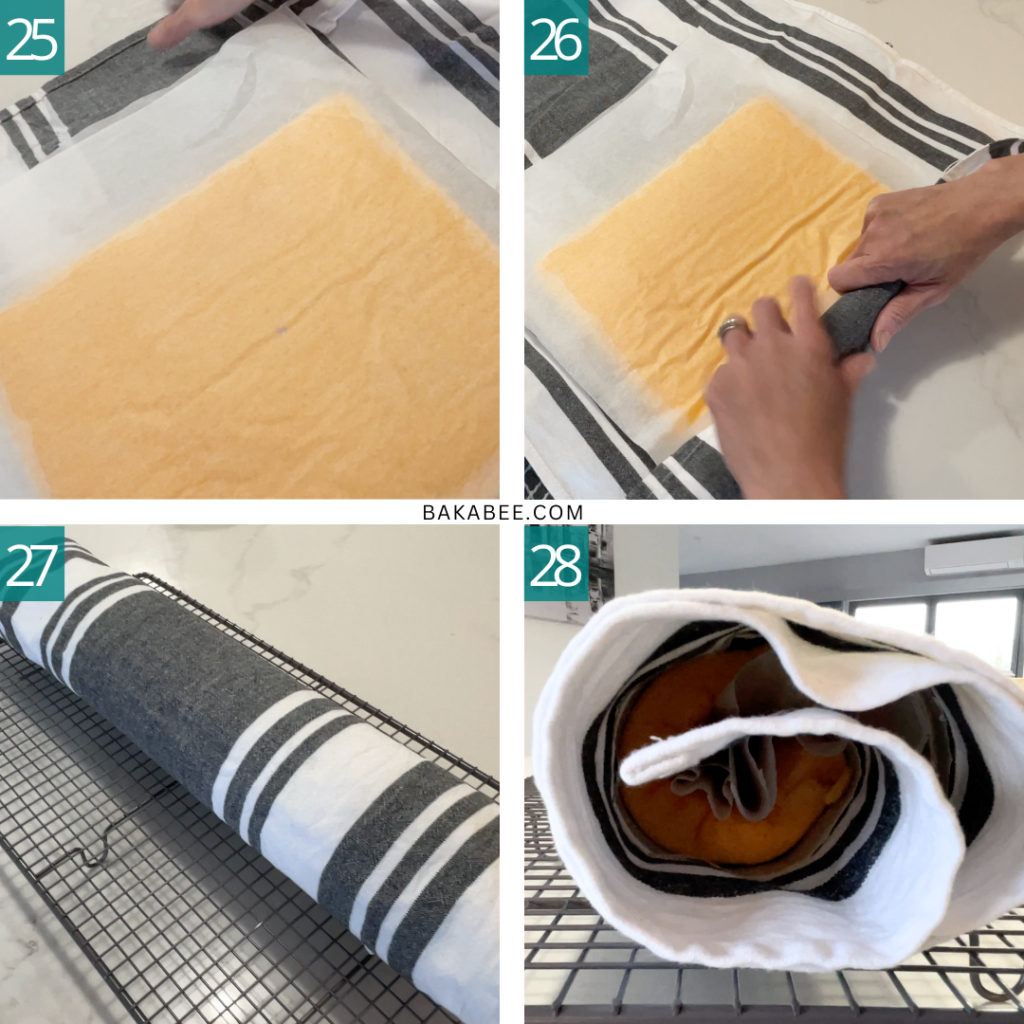
- Roll the cake: get a clean tea towel ready on the side. Flip the cake over again onto the tea towel and so the pattern is facing down.
- With the help of the parchment paper and the tea towel, start rolling the cake into a log.
- Cool completely on a wire rack.
- Place the seam down.
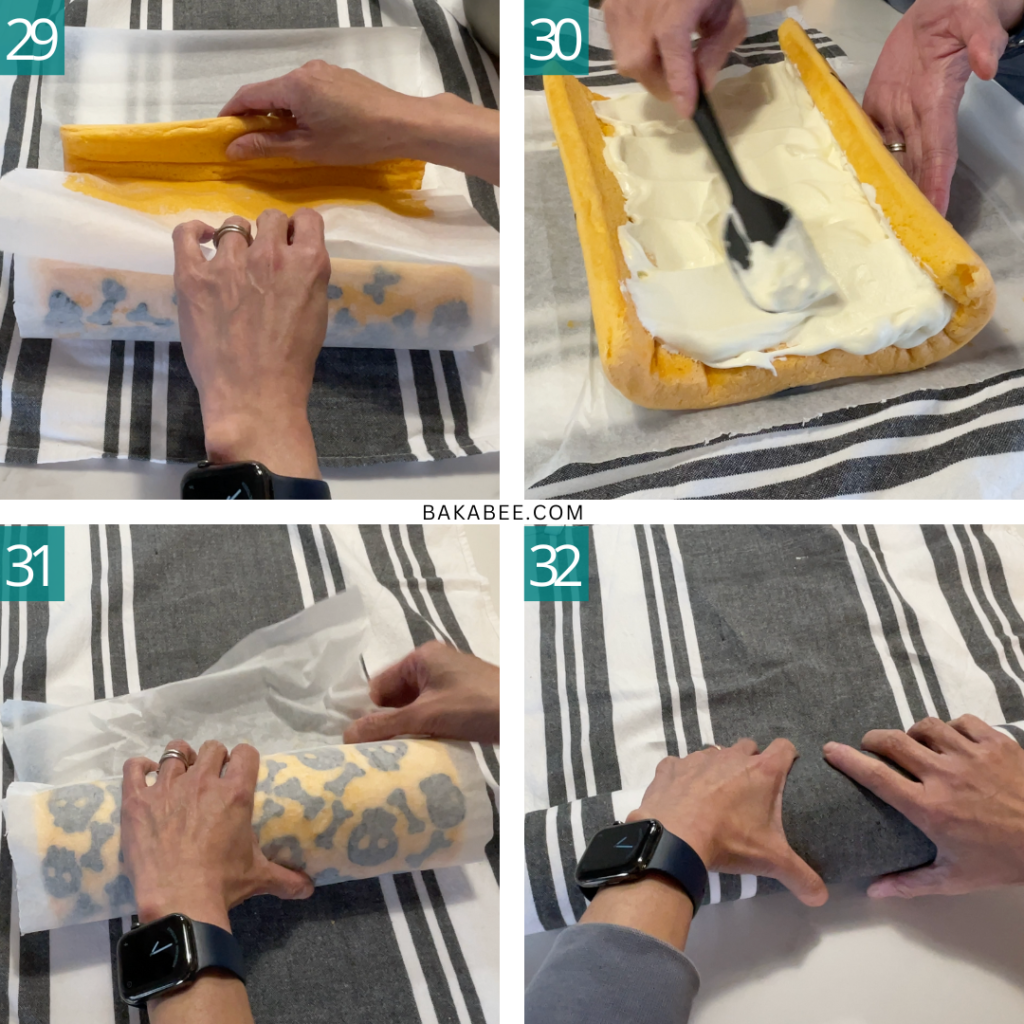
- Fill the cake: unroll the cooled cake and peel off the parchment paper inside.
- Fill the cake with chilled whipped cream.
- Use the parchment paper on the exterior to help roll the cake back up.
- Then layer of parchment with the tea towel again. Place the cake into the fridge to set.
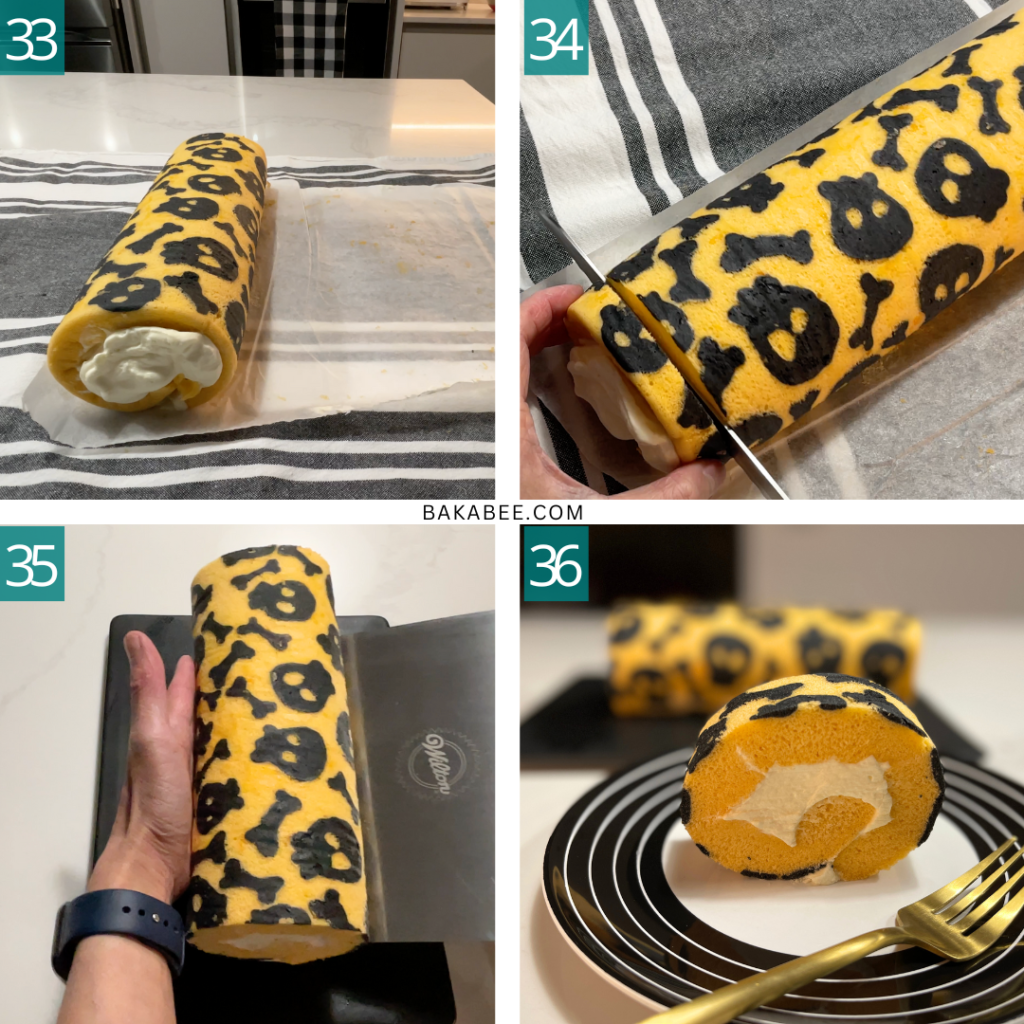
- Serve the cake: Remove the cake from the fridge and unwrap the parchment paper and towel.
- Use a sharp knife to slice off both ends.
- Serve on an elegant serving plate.
- Enjoy it with a cup of your favourite drink! Happy Halloween!
Delicious Filling Options to Elevate Your Halloween Pattern Swiss Roll
- Chocolate Ganache: Rich and decadent, a chocolate ganache filling adds a luscious, melt-in-your-mouth texture. You can make it dark, milk, or white chocolate, depending on your preference.
- Pumpkin Spice Cream: For a truly festive touch, try a creamy pumpkin spice filling made with pumpkin puree, cream cheese, and warm spices like cinnamon, nutmeg, and cloves. This filling adds a cozy fall flavour perfect for Halloween.
- Cream Cheese Frosting: A smooth and tangy cream cheese frosting filling offers a delightful balance to the sweetness of the roll. You can add a splash of orange juice or zest for a citrusy twist.
- Matcha Whipped Cream: For a unique and subtle flavour, matcha (green tea) whipped cream adds a slight earthy bitterness that complements the sweetness of the sponge. It also adds a lovely green colour that can look great with the Halloween theme.
- Strawberry or Raspberry Jam: For a fruity and slightly tart option, use a layer of strawberry or raspberry jam. You can combine it with whipped cream or mascarpone for added richness.
Check out my video tutorial
Tips for success
These things are always kept in my head when I bake sponge cakes, hope they will help you for a successful baking as well.
- Spread the Batter Evenly to avoid any thin or thick spots. This will help the cake bake uniformly and make it easier to roll. I like using an angled offset spatula to get the job done!
- Don’t Over bake the Cake, it will cause the sponge to become dry and crack when rolling. Keep a close eye on the baking time. Bake just until the edges start to pull away from the sides of the pan and the top springs back lightly when touched.
- Roll While Warm and pliable to avoid cracks. Use parchment paper and/or a clean kitchen towel to assist in rolling and prevent sticking.
- Cool Completely Before Filling which allow the rolled-up cake to cool completely before unrolling and spreading the whipped cream filling. This prevents the filling from melting and keeps the cake moist.
- Chill Before Slicing helps the filling set and makes it easier to cut clean, even slices.
Pin this recipe for later
Frequently Asked Questions
Yes, you can customize the filling to your liking! Options like chocolate ganache, cream cheese frosting, fruit jams, or even pumpkin spice cream work great with this vanilla Swiss roll.
Make sure to roll the cake while it is still warm and pliable. Use a clean kitchen towel or parchment paper to help guide the roll. Over baking the cake can also cause cracks, so be sure to bake just until done.
The Swiss roll is best enjoyed within 1-2 days. Store it in an airtight container in the refrigerator to keep it fresh and prevent the filling from spoiling.
Don’t worry if the pattern isn’t perfect! The Swiss roll will still taste delicious. Practice makes perfect, and the most important thing is to have fun with it. You can always cover small imperfections with a dusting of powdered sugar or a drizzle of chocolate.
More Swiss roll recipes that you might like
- Easter pattern Swiss roll
- Christmas pattern Swiss roll
- Flourless Walnut Swiss roll with coffee cream
- Black Sesame Swiss roll

Halloween Pattern Swiss Roll
- Author: Bakabee
- Prep Time: 1 hour
- Chill Time: 2 hours
- Cook Time: 11 mins
- Total Time: 3 hrs 11 mins
- Yield: 8 slices 1x
- Category: Cake
- Method: Bake
- Cuisine: European, Western
Description
This Halloween Pattern Swiss roll combines a soft and fluffy vanilla sponge cake with a light, sweet whipped cream filling for a delightful treat. Decorated with a cute skeleton and bones design, it’s the perfect dessert to add a fun and festive touch to your Halloween celebrations!
Ingredients
Halloween Pattern Batter
- 50 grams unsalted butter (softened)
- 30 grams icing sugar (sifted)
- 2 egg whites
- 50 grams all purpose flour
- 1 teaspoon activated charcoal powder / a few drops black gel food colouring
Swiss Roll Batter
- 5 eggs (separated)
- 65 grams caster sugar (divided 35 g + 30 g)
- 40 millilitres milk
- 40 millilitres vegetable oil
- 1 teaspoon vanilla extract
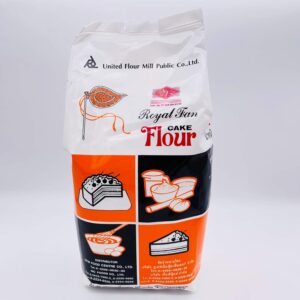
- 100 grams cake flour (sifted)
- a pinch of salt
- a few drops orange gel food colouring
- a few drops of lemon juice
Filling
- 1 cup double cream (chilled)
- 60 grams icing sugar
- 1 teaspoon vanilla extract
- a pinch of salt
Instructions
Prepare the pattern
- Spray cake release spray on the baking pan. Place the Halloween pattern in the centre of the pan. Line it with the parchment paper on top.
- Place the butter in a medium mixing bowl and sift in icing sugar. Beat until well combined. The mixture should be pale and fluffy.
- Add in egg whites and continue to beat around 2 minutes or until well incorporated.
- Sift in the flour and beat the mixture until a smooth batter.
- Add in the activated charcoal powder and mix in very gently as the powder is very fine, using a silicone spatula.
- Load the batter into a piping bag.
- Spray a very thin layer of cake release spray onto the parchment paper to avoid the patter getting stuck once the cake is baked. Wipe off any excess with a kitchen towel.
- Cut a tiny hole at the top of the piping bag and start piping following the template underneath. If you make a mess, wipe it off using kitchen paper and start again.
- Once happy with the pattern, place the baking pan in the freezer for about 30 mins or until the pattern is firm.
Prepare the cake batter
- Separate the eggs very carefully. Don’t let any yolks drop into the whites. Set the egg whites aside.
- Add 35 grams caster sugar into the egg yolks. Beat them at medium speed until pale and almost double in volume.
- Add the milk, vegetable oil and vanilla extract. Continue to beat until well mixed.
- Sift in flour and salt, beat until the mixture becomes a smooth batter.
- Add a few drops of orange gel food colouring to the batter and mix well until you are happy with the colour. Use a silicone spatula to scrape around the mixing bowl to make sure everything is well mixed.
- At this point, let’s preheat the oven to 165 C to make sure the oven is nice and hot once the cake batter is ready to be baked.
Prepare the egg whites
- Place the egg whites in a large mixing bowl and add in a few drops of lemon juice / vinegar / ¼ tsp of cream of tartar to stabilise them.
- Whisk egg whites until foamy on the surface, add in 30 g caster sugar in three stages. Give it 30 seconds or 1 minute in between to let the sugar dissolve before adding the next.
- Once the sugar is added, turn the mixer at medium-high speed and continue to whisk the egg whites until stiff peaks – the egg whites will turn thick, glossy and can hold their shape.
- Scoop a small amount of beaten egg whites into the cake batter to loosen its texture.
- Scoop one-third of the meringue at a time and gently fold into the cake batter using a whisk.
- Gently, completely fold in each portion (until you can’t see any white blobs) before adding the next portion.
- When all the meringue is folded in, use a spatula for a final gentle mix to make sure everything is well combined.
Bake and roll the cake
- Take the firmed pattern from the freezer and remove the original design template from under the parchment paper.
- Pour the cake batter onto the pattern batter. Use an offset spatula to even out the surface. Drop the pan (from the height of a few inches) a few times against the work surface to get rid of any big air bubbles trapped inside the batter.
- Bake the cake in the preheated oven at 165℃ / 325℉ for about 10 to 11 minutes or until a skewer inserted in the centre comes out clean.
- Once the cake is done, take it out from the oven immediately. Remove the cake from the pan when you can handle it without gloves (be careful) and peel off the parchment paper on the sides.
- Place a new sheet of parchment paper on top and flip it over. Peel off the baked parchment paper to reveal the pattern.
- Get a clean tea towel ready on the side. Place a new sheet of parchment paper on top of the patterned side. Flip the cake over again onto the tea towel so the pattern is facing down.
- With the help of the parchment paper and the tea towel, start rolling the cake into a log. The tea towel will keep the cake moist and soft. Cool completely on a wire rack, with the seam facing down.
Prepare the filling
- Before whipping, chill the mixing bowl in advance.
- Add a pinch of salt in the icing sugar. Mix well and set aside.
- Add chilled double cream, icing sugar mixture and vanilla extract in the chilled mixing bowl. Whisk at medium speed.
- Continue whisking at medium speed until it reaches a thick, firm and spreadable consistency.
- Cover with a lid or cling film and pop it back to the fridge until needed.
Assemble and serve the cake
- Unroll the cooled cake and peel off the parchment paper inside.
- Scoop a generous amount of whipped cream into the curled inner edge (which will become the centre of the cake), followed by an even layer across the remainder of the flat surface of the cake, using an offset spatula.
- Now use the parchment paper on the exterior to help roll the cake back up and with the tea towel again. Place the cake into the fridge to set, for around one to two hours.
- Remove the cake from the fridge and unwrap the parchment paper and towel. Use a sharp knife to slice off both ends of the roll to make it look neat.
- Serve on an elegant serving plate and enjoy. Happy Halloween!
Notes
- Watch my video tutorial to see how this Halloween pattern Swiss roll is made.
- You can dye the pattern to any colour of your liking.
- Swiss roll cake is at its best when consumed on the same day. You can place it in an airtight container in the fridge for up to 3 days (it never lasts that long in our house).
Nutrition
- Serving Size: 1 slice
- Calories: 475kcal
- Sugar: 23.6g
- Sodium: 122mg
- Fat: 28.7g
- Saturated Fat: 3.8g
- Carbohydrates: 29.1g
- Fiber: 0.2g
- Protein: 12.1g
- Cholesterol: 233mg
And there you have it—a cute and spooky skeleton Swiss roll that’s perfect for adding a touch of Halloween fun to your dessert table!
I hope you enjoyed making this as much as you’ll enjoy eating it. Don’t be afraid to get creative with your patterns, fillings, and flavours—this recipe is all about having fun in the kitchen and celebrating the playful spirit of Halloween. So, gather your loved ones, roll up those sleeves, and make some deliciously delightful memories. Happy baking, and have a fang-tastic Halloween! 🎃👻
Share this!

